
Access a Kubernetes Cluster
🛡️ Intro
This section will show you how you can make Kubernetes clusters available as a Border0 service, while maintaining support for native tooling (e.g. kubectl).
NoteThis documentation is for Kubernetes sockets. This type of socket gives your users the ability to interact with a Kubernetes cluster by communicating with the Kubernetes API in the cluster.
If you are interested in only exposing
execaccess to pods, we recommend using an SSH socket with a Kubernetes upstream type .
Putting your Kubernetes Cluster behind Border0 has many benefits:
- Leverage your organization's SSO for user authentication
- Leverage Border0 Policies for authorization
- Enhanced visibility of who is accessing what, when, and from where
- Rich session logs including video replay for
execstreams into pods - Minimal workflow changes - your users can still use
kubectlor any Kubernetes client the way they are used to
The high-level steps to setting-up a Border0 service for Kubernetes are:
Note: detailed, step-by-step, instructions can be found in the In-Cluster and Out-of-Cluster sections below.
- Run a Border0 Connector with network connectivity to the Kubernetes API for the cluster (typically running as the
kube-apiserverdeployment in thekube-systemnamespace)- Ideally you would run the connector within the cluster to simplify the set-up requirements, but this document will guide you through all the deployment modes possible
- Create a new Kubernetes socket with the desired configuration, for example:
- How will the connector find configuration on its file system
- How will the connector communicate against the Kubernetes API
- How will the connector authenticate against the Kubernetes API
- Define Border0 policies for your Kubernetes socket. This is where you can define specific fine grained access controls for specific users and groups.
Permissions / Kubernetes RBAC
The Kubernetes identity of the Border0 connector is ultimately the one making requests to your upstream Kubernetes API. Therefore you must give the connector sufficient permissions for it to be able to perform any requests that your users might be making.
The recommended approach is to give the connector unrestricted access to the cluster with the ClusteRole below, and manage individual users' permissions with Border0 policies.
kind: ClusterRole
apiVersion: rbac.authorization.k8s.io/v1
metadata:
  name: super-admin
rules:
- apiGroups: ["*"]  # matches all API groups
  resources: ["*"]  # matches all resources
  verbs: ["*"]      # matches all operations
Deployment Modes
How you define your socket configuration majorly depends on where/how your connector is deployed. The two deployment modes are:
- In-Cluster: the connector is running within the Kubernetes cluster as a Kubernetes deployment with an associated service account capable of listing namespaces and pods, getting pods, and creating exec resources for pods.
- Out-of-Cluster: the connector is running in compute not associated with the Kubernetes cluster.
When the connector is deployed In-Cluster, socket configuration will be identical regardless of where the Kubernetes cluster is running. In other words, socket configuration is no different whether the cluster is on-premises, AWS EKS, GCP GKE, Azure Kubernetes Service, or any other managed Kubernetes cluster provider.
It is highly recommended to deploy a Border0 connector In-Cluster due to its simple configuration (relative to Out-of-Cluster) if you are planning to primarily expose Kubernetes resources. Out-of-Cluster is recommended if you want to expose Kubernetes resources in addition to other resources outside of the Kubernetes cluster e.g. other types of compute and you only want to run a single connector. Though keep in mind, you may choose to run as many connectors as you see fit - your clients (employees / users) will not notice any difference in experience
Both options provide the same flexibility in terms of what is ultimately exposed to clients (employees / users) behind sockets. For example, you may choose to expose the whole cluster behind a single socket, specific namespaces behind various sockets, or even specific pods (with the use of Kubernetes selectors) behind various sockets.
In-Cluster
When you have a connector running in the Kubernetes cluster, exposing Kubernetes resources becomes quite trivial.
We recommend running the connector as a Kubernetes Deployment with a Kubernetes Service Account tied to the Kubernetes ClusterRole outlined in the Permissions / Kubernetes RBAC section above.
For a full.yaml configuration file, you may refer to the example found in our examples repository here. Be sure to read the notes at the top of the file before applying the Kubernetes definitions to your cluster. For more details about this example refer to the FAQ: "What's the fastest way to expose an entire Kubernetes cluster behind Border0?".
Creating a Border0 Socket for an In-Cluster Connector
To make containers on Kubernetes available, follow the following steps
- In the Sockets page, click on "Add New Socket" and click the "Kubernetes" tile
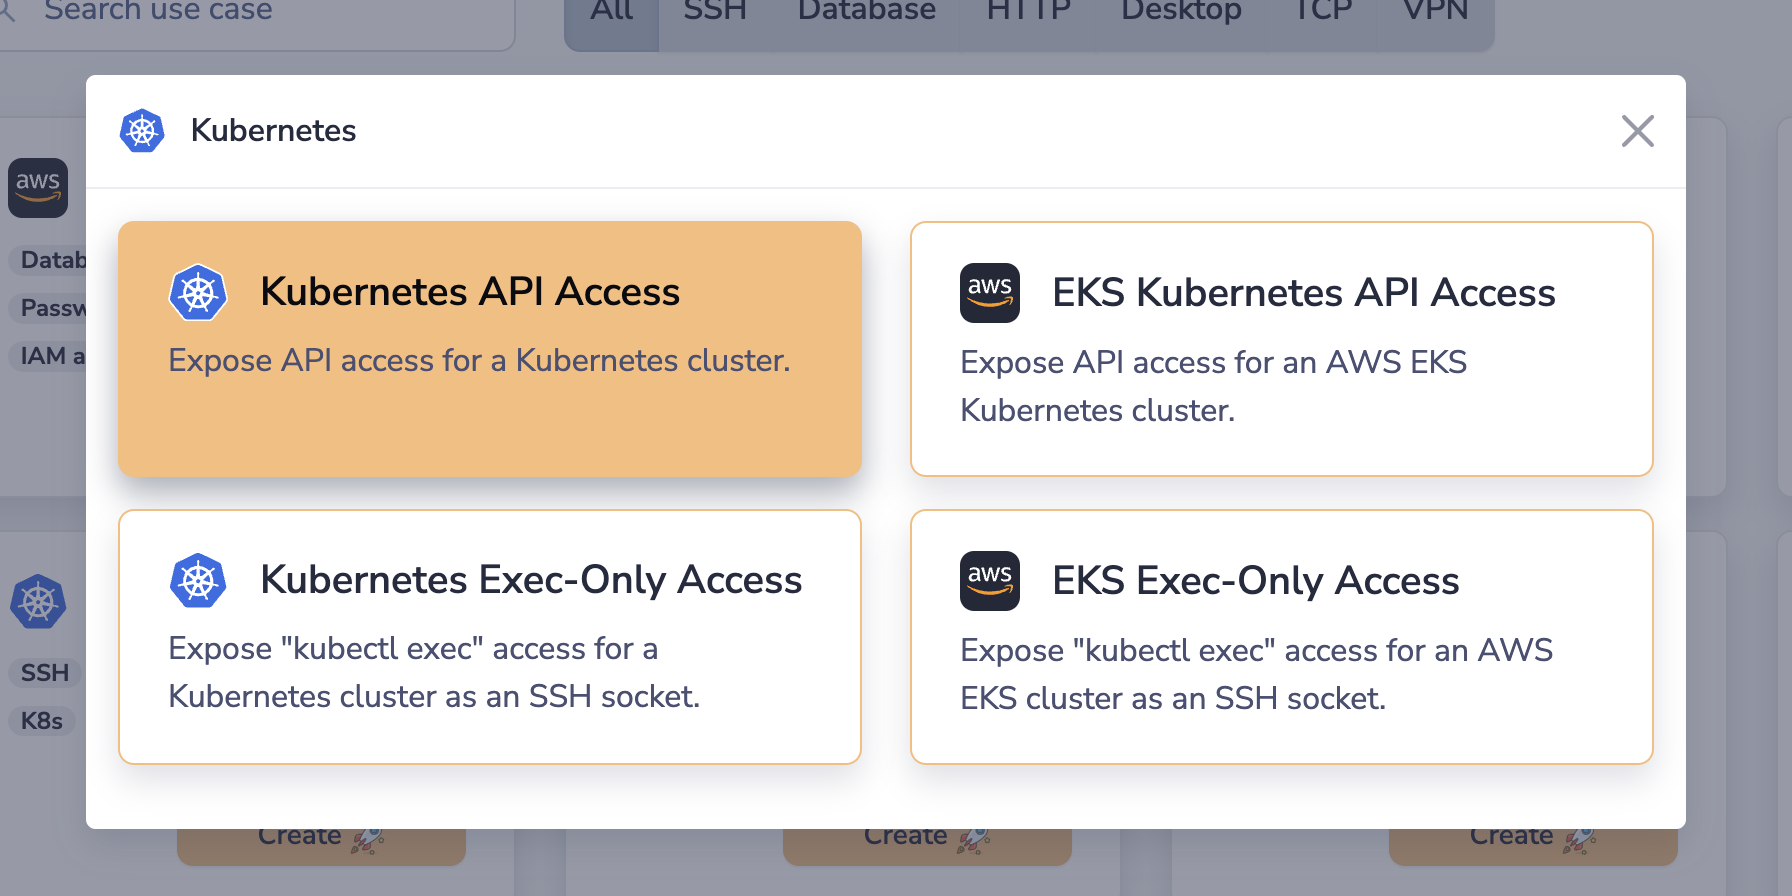
- Select the "Kubernetes API Access" tile
- Set a name and, optionally, a description
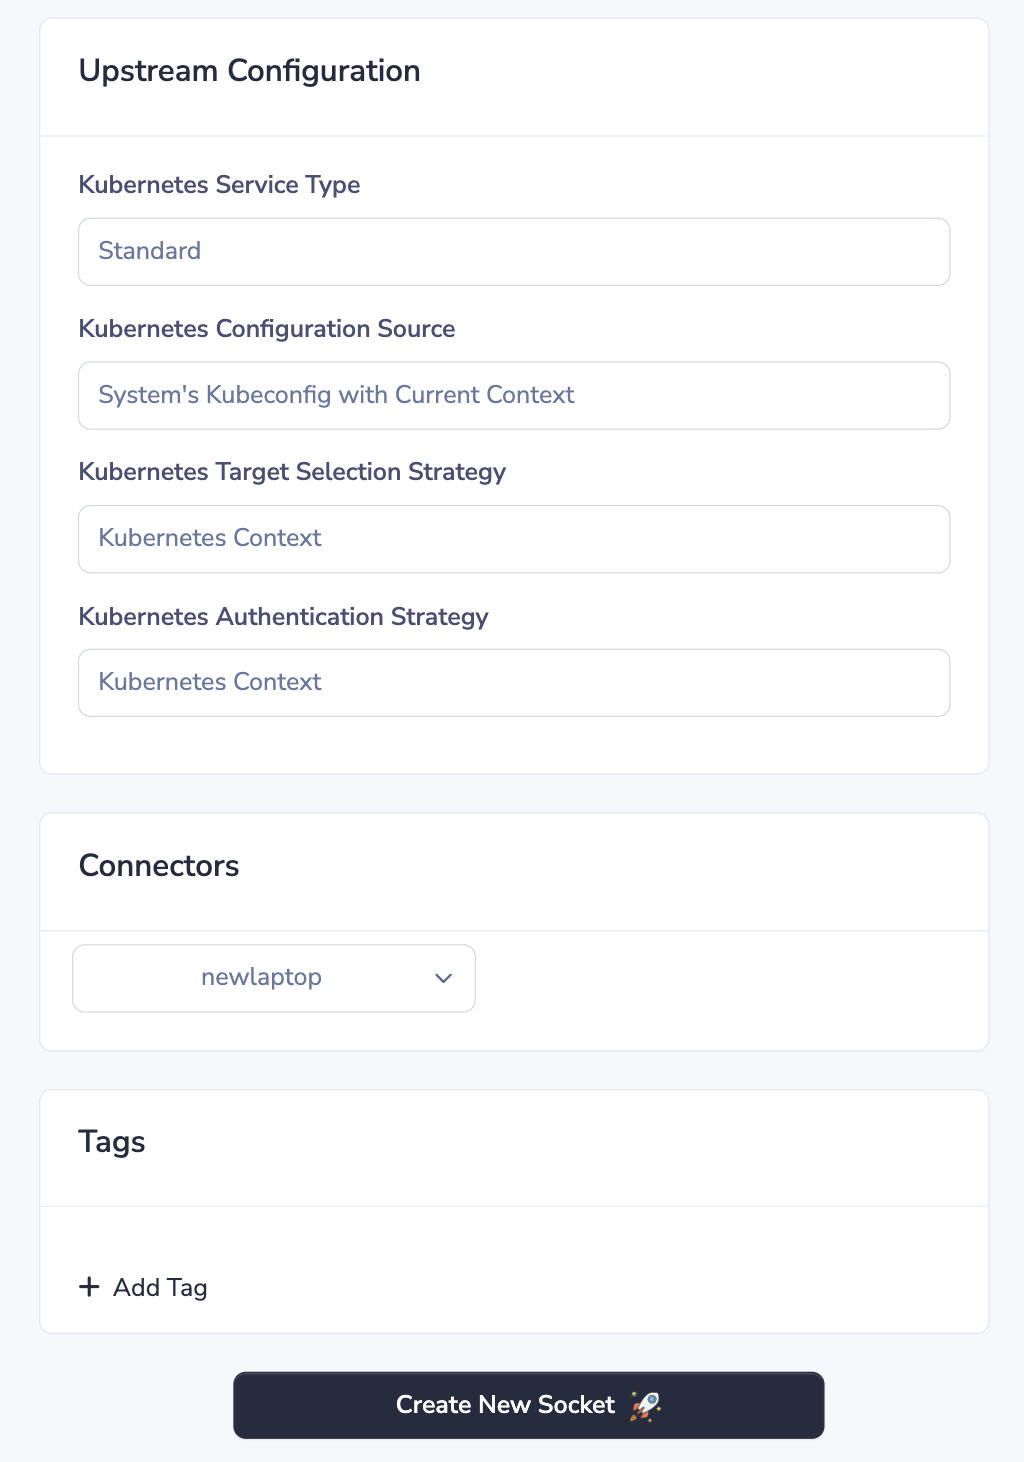
- Ensure the Kubernetes Service Type drop-down is set to Standard
- From the Kubernetes Configuration Source dropdown select System's Kubeconfig With Current Context
- From the Kubernetes Target Selection Strategy dropdown select Kubernetes Context
- From the Kubernetes Authentication Strategy drowndown select Kubernetes Context
- Lastly, we select our target connector
- Click Create Socket at the bottom of the page
Out-of-Cluster
When you have a connector running outside the Kubernetes cluster, exposing Kubernetes resources requires slightly more configuration depending on how the connector will be authenticating against the cluster.
Heads-up!If your connector has access to Kubernetes credentials (with the right permissions) in the file system, then configuration of sockets when the connector is Out-of-Cluster is identical to when it is In-Cluster.
Creating a Border0 Socket for an Out-of-Cluster Connector
The main difference in configuration between sockets for In-Cluster and Out-of-Cluster connectors is that when the connector is running Out-of-Cluster, it might be necessary to provide a non-default Master URL and Kubeconfig Path. This can be done by choosing the Master URL and Kubeconfig Path option from the Kubernetes Authentication Strategy dropdown. Below we go over the entire list of steps including this additional step.
- In the Sockets page, click on "Add New Socket" and click the "Kubernetes" tile
- Select the "Kubernetes API Access" tile
- Set a name and, optionally, a description
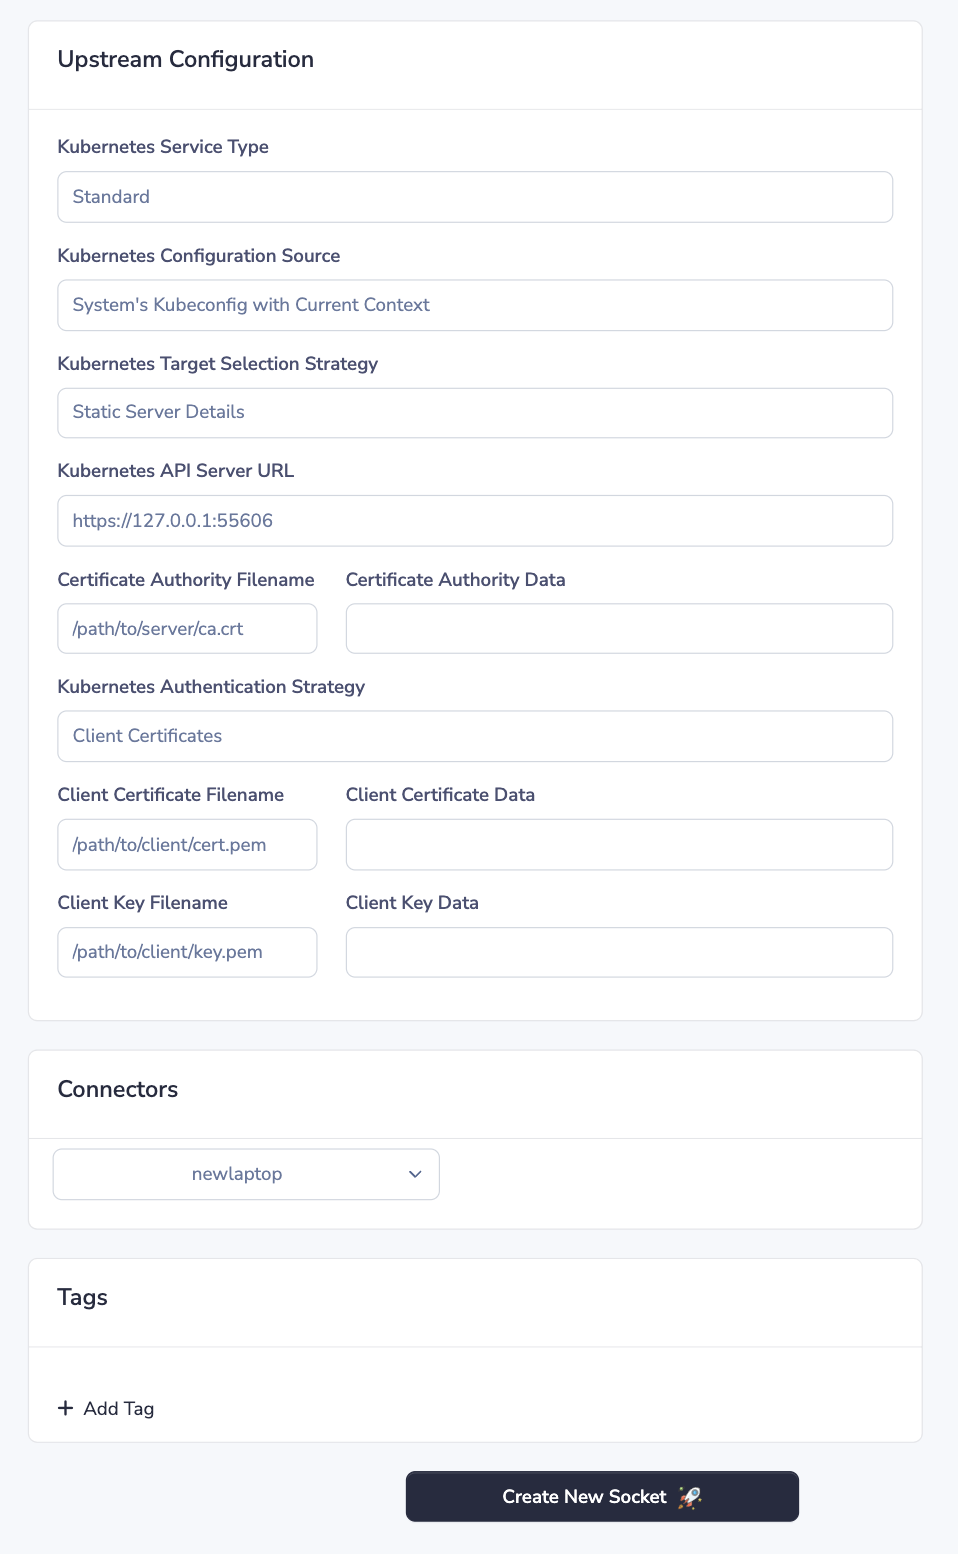
- Ensure the Kubernetes Service Type drop-down is set to Standard.
- From the Kubernetes Configuration Source dropdown select System's Kubeconfig With Current Context, unless you wish to provide a static path to the kubeconfig file or a static context name
- From the Kubernetes Target Selection Strategy dropdown select:
- Kubernetes Context if you wish to use the Kubernetes API server details defined in the current context
- Static Server Details if you wish to provide a static API server URL and/or a static CA certificate
- From the Kubernetes Authentication Strategy drowndown select:
- Kubernetes Context if you wish to use the authentication details defined in the user of the current context
- This option will result in the connector respecting Kubernetes' default precedence of configuration loading rules. e.g. environment variables first, then kubeconfig files, then in-cluster configuration.
- Client Certificates if you wish for the connector to authenticate against the Kubernetes API with a static client certificate and key (or read them from files in the file system)
- Bearer Token if you wish for the connector to authenticate against the Kubernetes API with a static bearer token (or read it from a file in the file system)
- Kubernetes Context if you wish to use the authentication details defined in the user of the current context
- Lastly, we select our target connector
- Click Create Socket at the bottom of the page
Policy Based Access
Border0 policies are used to control who has access to what sockets and under what conditions. They are essentially identity, application, and context aware firewall rules.
In order for your users to have access to a Kubernetes socket, the user (or a group they are a member of) must be named in a policy attached to that socket. The policy must have the Kubernetes permission enabled:

By default, a policy with the Kubernetes permission enabled will allow clients to perform any/all actions against the Kubernetes socket. If you wish to define exactly which actions can be performed against the Kubernetes sockets, you should enable rules.
NoteOnce rules are enabled, the behaviour changes to deny all actions by default.
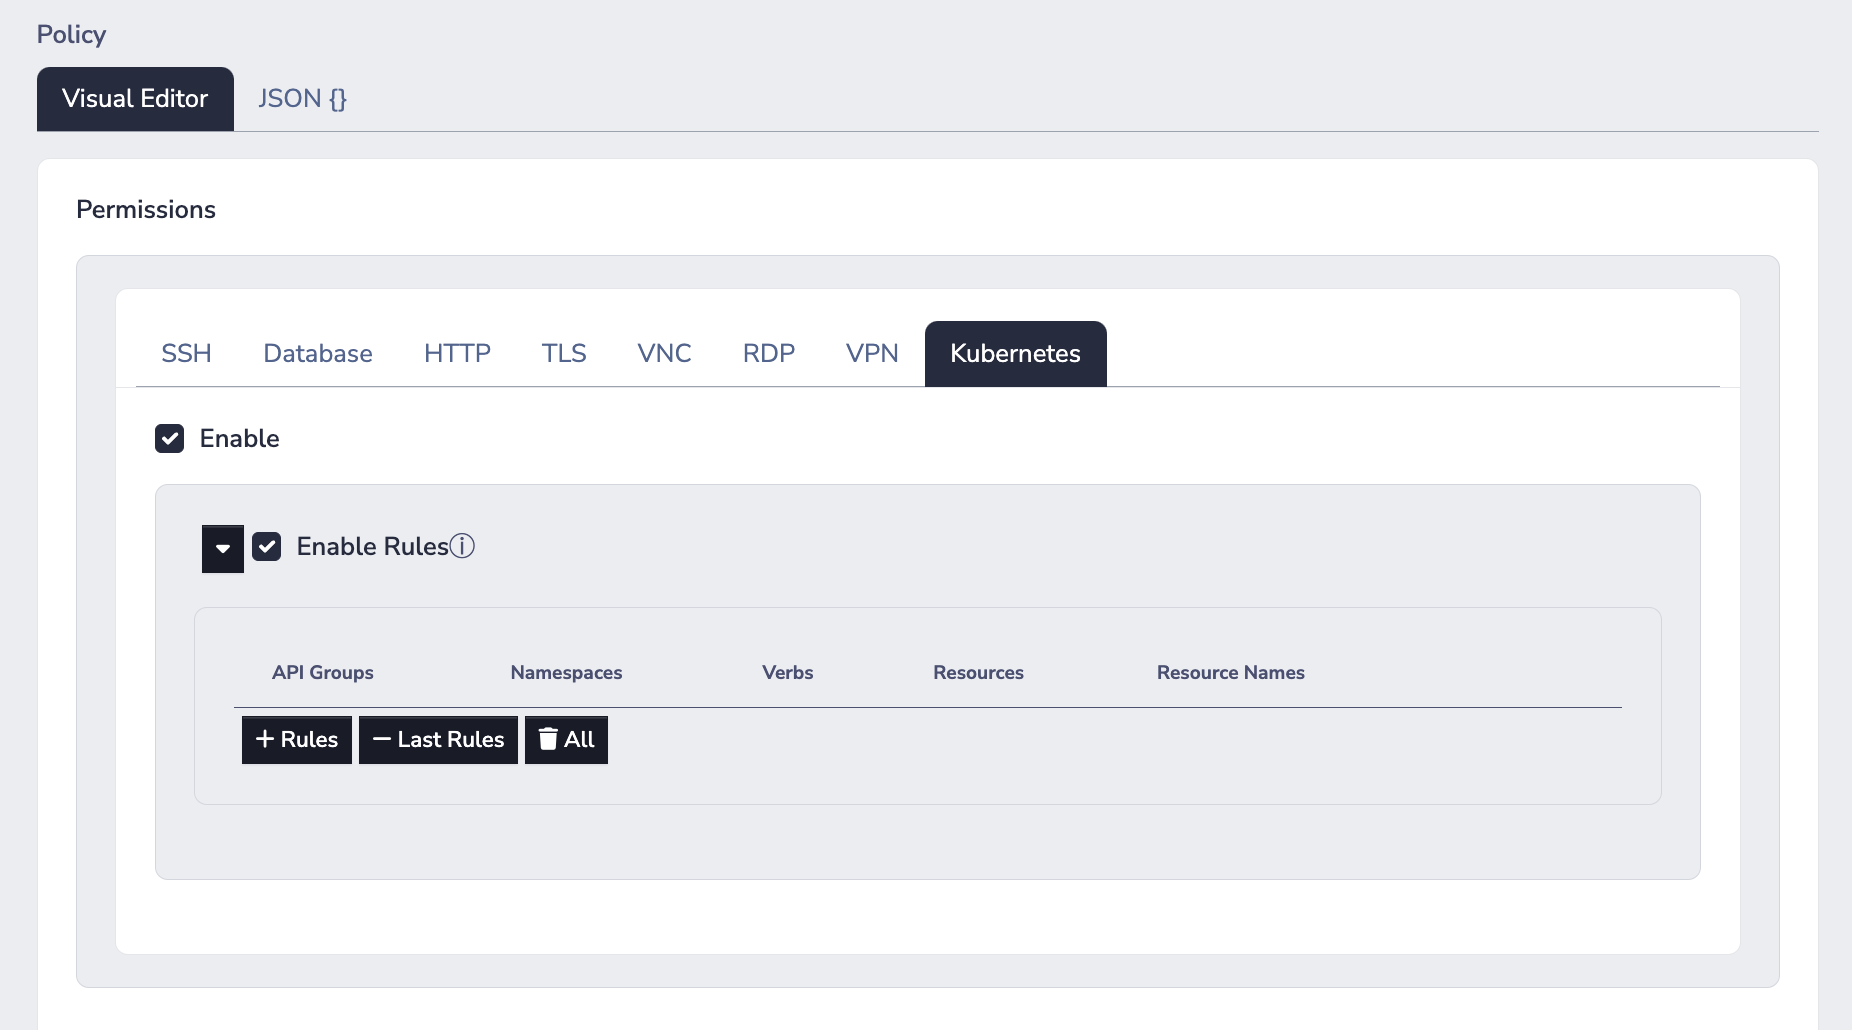
With rules enabled, you can define specific actions in terms of Kubernetes specific entities:
- API Groups
- Namespaces
- Verbs
- Resources e.g. "pods", "deployments", "services", "namespaces", and so on...
- Resource Names e.g. "my-cool-pod-1", "my-nginx-deployment", and so on...
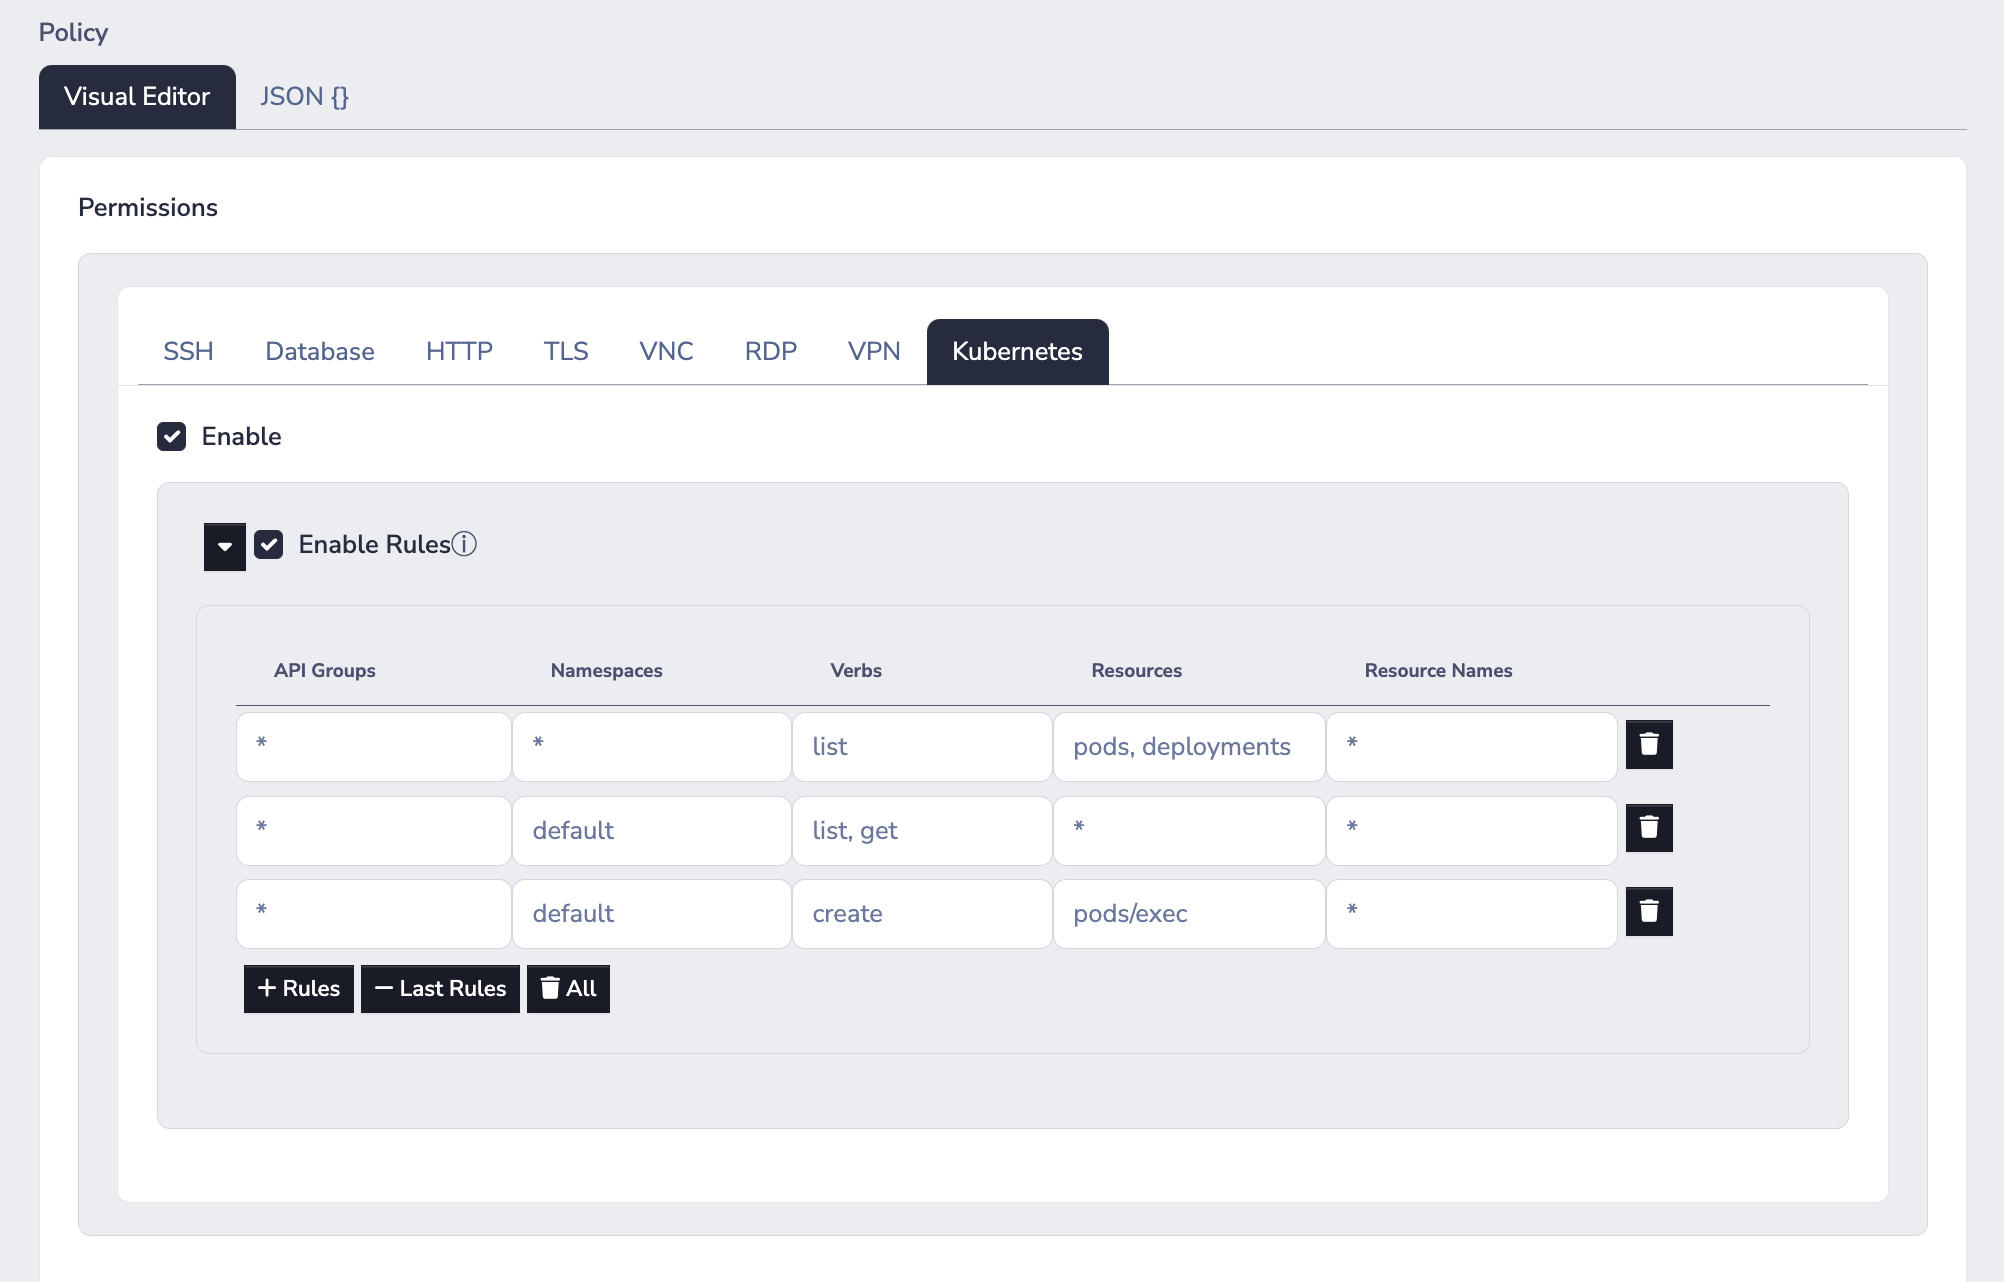
For example, the image below is for a policy with three rules:
- The first rule allows
listingpodsanddeploymentsin all namespaces - The second rule allows
listing andgeting all resource types in the "default" namespace - The third rule allows
createingpods/execresources for all pods in the "default" namespace
Connecting as a Client
Follow the steps below to set-up your local Kubernetes configuration for a Border0 Kubernetes socket:
- Authenticate as a client of the right Border0 organization
border0 client login- Set (or update) the Kubernetes context for the service
border0 client kubeconfig set- You are ready to run Kubernetes commands!
NoteIf you are using
kubectlversions >= 1.30, you must set the environment variableKUBECTL_REMOTE_COMMAND_WEBSOCKETS=false. Kubernetes broke support forexecover HTTPS proxies in this version - more info in https://github.com/kubernetes/kubernetes/issues/126134.
kubectl get podsAWS EKS
Exposing resources in AWS EKS is possible through both In-Cluster and Out-of-Cluster Border0 connectors. As noted above, if your connector is running In-Cluster, your socket configuration will be that of a standard Kubernetes Border0 socket - it will not have any configuration specific to AWS. If this is your scenario, you should refer to
On the other hand, if your connector is running Out-of-Cluster, there will be a few more AWS-IAM related configuration steps that administrators must take in order to make the Kubernetes cluster (in AWS EKS) available to the connector.
Known Limitation for Connector Out-of-Cluster EKS
Heads up!
AWS's chosen authorization approach for EKS clusters prevents Border0 connectors outside of the cluster from automatically having access to resources within EKS clusters having only AWS IAM credentials.
The connector's AWS IAM identity (e.g. an AWS IAM Role), must be mapped to a Kubernetes identity in a special ConfigMap called aws-auth, present in the kube-system namespace (in each AWS EKS Cluster you'd like to expose behind a given connector.
If there is no mapping for the connector's AWS IAM identity, any request from the connector to the Kubernetes API will result in an unauthorized response. Therefore, Border0 cannot edit the ConfigMap without first having access to the cluster.
(1) Configure AWS IAM Permissions for Connector
Heads-up!If you use the Border0 CLI's built-in connector installer for AWS, this will be handled for you.
In order for the Border0 connector to automatically discover AWS EKS clusters, the connector's AWS IAM identity must have the following policy document as part of its IAM Policy:
Version: '2012-10-17'
Statement:
  - Effect: Allow
    Action:
      - 'eks:ListClusters'
      - 'eks:DescribeCluster'
    Resource: '*'
i.e. the connector AWS IAM identity will be able to list and describe any AWS EKS clusters in your AWS account.
(2) Configure Kubernetes Cluster Authorization
You may choose between the following 3 options for granting a connector outside of your EKS cluster the ability to connect to pods/containers within your cluster:
- (a) Use the
system:mastersKubernetes RBAC Group - (b) Use an existing Kubernetes RBAC Group
- Note that this RBAC Group must have, at a minimum, the permissions outlined in the Permissions / Kubernetes RBAC section above
- (c) Create a new Kubernetes RBAC Group
(a) Use the system:masters Kubernetes RBAC Group
system:masters Kubernetes RBAC Group
Heads-up!Assigning the Border0 connector's AWS IAM role to the
system:mastersgroup implies granting the Border0 connector full administrative privileges over the cluster. We recommend against using this method in production environments, in favour of approaches (b) or (c) below.
To associate the Border0 Connector AWS IAM identity with the system:masters Kubernetes RBAC group, edit the aws-auth ConfigMap in the kube-system namespace and append the following to mapRoles (replacing [[ THE AWS IAM ROLE OF YOUR BORDER0 CONNECTOR ]] with the AWS IAM Role of your Border0 connector):
- groups:
  - system:masters
  rolearn: [[ THE AWS IAM ROLE OF YOUR BORDER0 CONNECTOR ]]
  username: border0-connector
NoteYou can edit the ConfigMap with the commands:
- Set your kubectl context to that of the AWS EKS cluster
aws eks update-kubeconfig --region ${AWS_EKS_CLUSTER_REGION} --name ${AWS_EKS_CLUSTER_NAME}
- Edit the
aws-authConfigMapkubectl edit configmap aws-auth --namespace kube-system
The resulting aws-auth ConfigMap should look something like this
$ kubectl describe configmap/aws-auth -n kube-system
Name:         aws-auth
Namespace:    kube-system
Labels:       <none>
Annotations:  <none>

Data
====
mapRoles:
----
- groups:
  - system:bootstrappers
  - system:nodes
  rolearn: arn:aws:iam::123456789012:role/my-eks-cluster-bootstrapper-role-arn
  username: system:node:{{EC2PrivateDNSName}}
- groups:
  - system:masters
  rolearn: arn:aws:iam::123456789012:role/border0-aws-connector
  username: border0-connector


BinaryData
====

Events:  <none>
(b) Use an existing Kubernetes RBAC Group
Heads-Up!The RBAC Group must have, at a minimum, the permissions outlined in the Permissions / Kubernetes RBAC section above
To associate the Border0 Connector AWS IAM identity with a Kubernetes RBAC group of your choosing, edit the aws-auth ConfigMap in the kube-system namespace and append the following to mapRoles (replacing the [[ KUBERNETES RBAC GROUP IDENTIFIER ]] and [[ THE AWS IAM ROLE OF YOUR BORDER0 CONNECTOR ]] with the appropriate values):
- groups:
  - [[ KUBERNETES RBAC GROUP IDENTIFIER ]]
  rolearn: [[ THE AWS IAM ROLE OF YOUR BORDER0 CONNECTOR ]]
  username: border0-connector
NoteYou can edit the ConfigMap with the commands:
- Set your kubectl context to that of the AWS EKS cluster
aws eks update-kubeconfig --region ${AWS_EKS_CLUSTER_REGION} --name ${AWS_EKS_CLUSTER_NAME}
- Edit the
aws-authConfigMapkubectl edit configmap aws-auth --namespace kube-system
The resulting aws-auth ConfigMap should look something like this
$ kubectl describe configmap/aws-auth -n kube-system
Name:         aws-auth
Namespace:    kube-system
Labels:       <none>
Annotations:  <none>

Data
====
mapRoles:
----
- groups:
  - system:bootstrappers
  - system:nodes
  rolearn: arn:aws:iam::123456789012:role/my-eks-cluster-bootstrapper-role-arn
  username: system:node:{{EC2PrivateDNSName}}
- groups:
  - your-custom-group
  rolearn: arn:aws:iam::123456789012:role/border0-aws-connector
  username: border0-connector


BinaryData
====

Events:  <none>
(c) Create a new Kubernetes RBAC Group
This is the recommended approach, following the principle of least privilege.
First we create a new ClusterRole and ClusterRoleBinding
The ClusterRole defines a cross-namespace Kubernetes RBAC Role which allows the connector to perform its necessary capabilities.
The ClusterRoleBinding binds the role to a Kubernetes RBAC Group which we will use in the next step.
---
kind: ClusterRole
apiVersion: rbac.authorization.k8s.io/v1
metadata:
  name: border0-connector
rules:
  # rule for connector to have unrestricted access to the cluster
  - apiGroups: ["*"]
    resources: ["*"]
    verbs: ["*"]
---
kind: ClusterRoleBinding
apiVersion: rbac.authorization.k8s.io/v1
metadata:
  name: border0-connector
roleRef:
  kind: ClusterRole
  name: border0-connector
  apiGroup: rbac.authorization.k8s.io
subjects:
  - kind: Group
    name: border0-connector
  	apiGroup: rbac.authorization.k8s.io
Now that you have a new Group border0-connector, you may follow the instructions of (b) Use an existing Kubernetes RBAC Group, replacing [[ KUBERNETES RBAC GROUP IDENTIFIER ]] with the string border0-connector.
Creating a Border0 Socket for an Out-of-Cluster Connector (AWS EKS)
Heads-up!Configuring Kubernetes Cluster Authorization is a prerequisite to creating sockets for AWS EKS clusters when the connector is running outside of the cluser.
To make containers on AWS EKS available, follow the steps below:
- In the Sockets page, click on "Add New Socket" and click the Kubernetes tile
- Set a name and, optionally, a description
- Ensure the Kubernetes Service Type drop-down is set to AWS EKS
- Specify the EKS Cluster Name and EKS Cluster Region
- We require a region so that connectors outside of your EKS cluster's AWS region are able to connect to the right cluster.
- Specify the AWS Authentication Strategy (how the connector authenticates against AWS)
- Lastly, we select our target connector
- Click Create Socket at the bottom of the page
FAQ
Q: What's the fastest way to expose an entire Kubernetes cluster behind Border0?
A:
- Navigate to the "Connectors" tab in the Border0 portal
- Create a new connector and a new connector token
- Download our sample
.yamlfrom here - Replace the stub in the file
[[ YOUR TOKEN GOES HERE ]]with your actual token string - Run
kubectl apply -f connector.yaml - Create a new socket for the connector by choosing the "Kubernetes" tile, leave all configuration as-is, click create.
This will work regardless of whether the Kubernetes cluster is on-premises, in a cloud provider, or locally on your machine.
Updated about 1 year ago