Remote SSH server
Secure Remote SSH Access with Border0
Border0 facilitates secure access to remote SSH servers by your connector acting as a proxy. Incoming SSH requests are handled by your Border0 connector, which then forwards them to your target SSH server. This method allows users to authenticate using Single Sign-On (SSO) credentials, eliminating the need for direct SSH key or password management.
Border0 supports the following SSH authentication methods for connecting to upstream servers:
- Key-based authentication
- Username & Password authentication
- Certificate-based authentication
Securing your credentialsWhile Border0 encrypts stored credentials, we strongly recommend implementing local credential storage for enhanced security. This can be achieved by integrating Border0 with your existing secret management solution. Refer to our guide on storing secrets for more information:
https://docs.border0.com/docs/using-secret-managers-to-store-credentials
1 - Username & Password Based Authentication
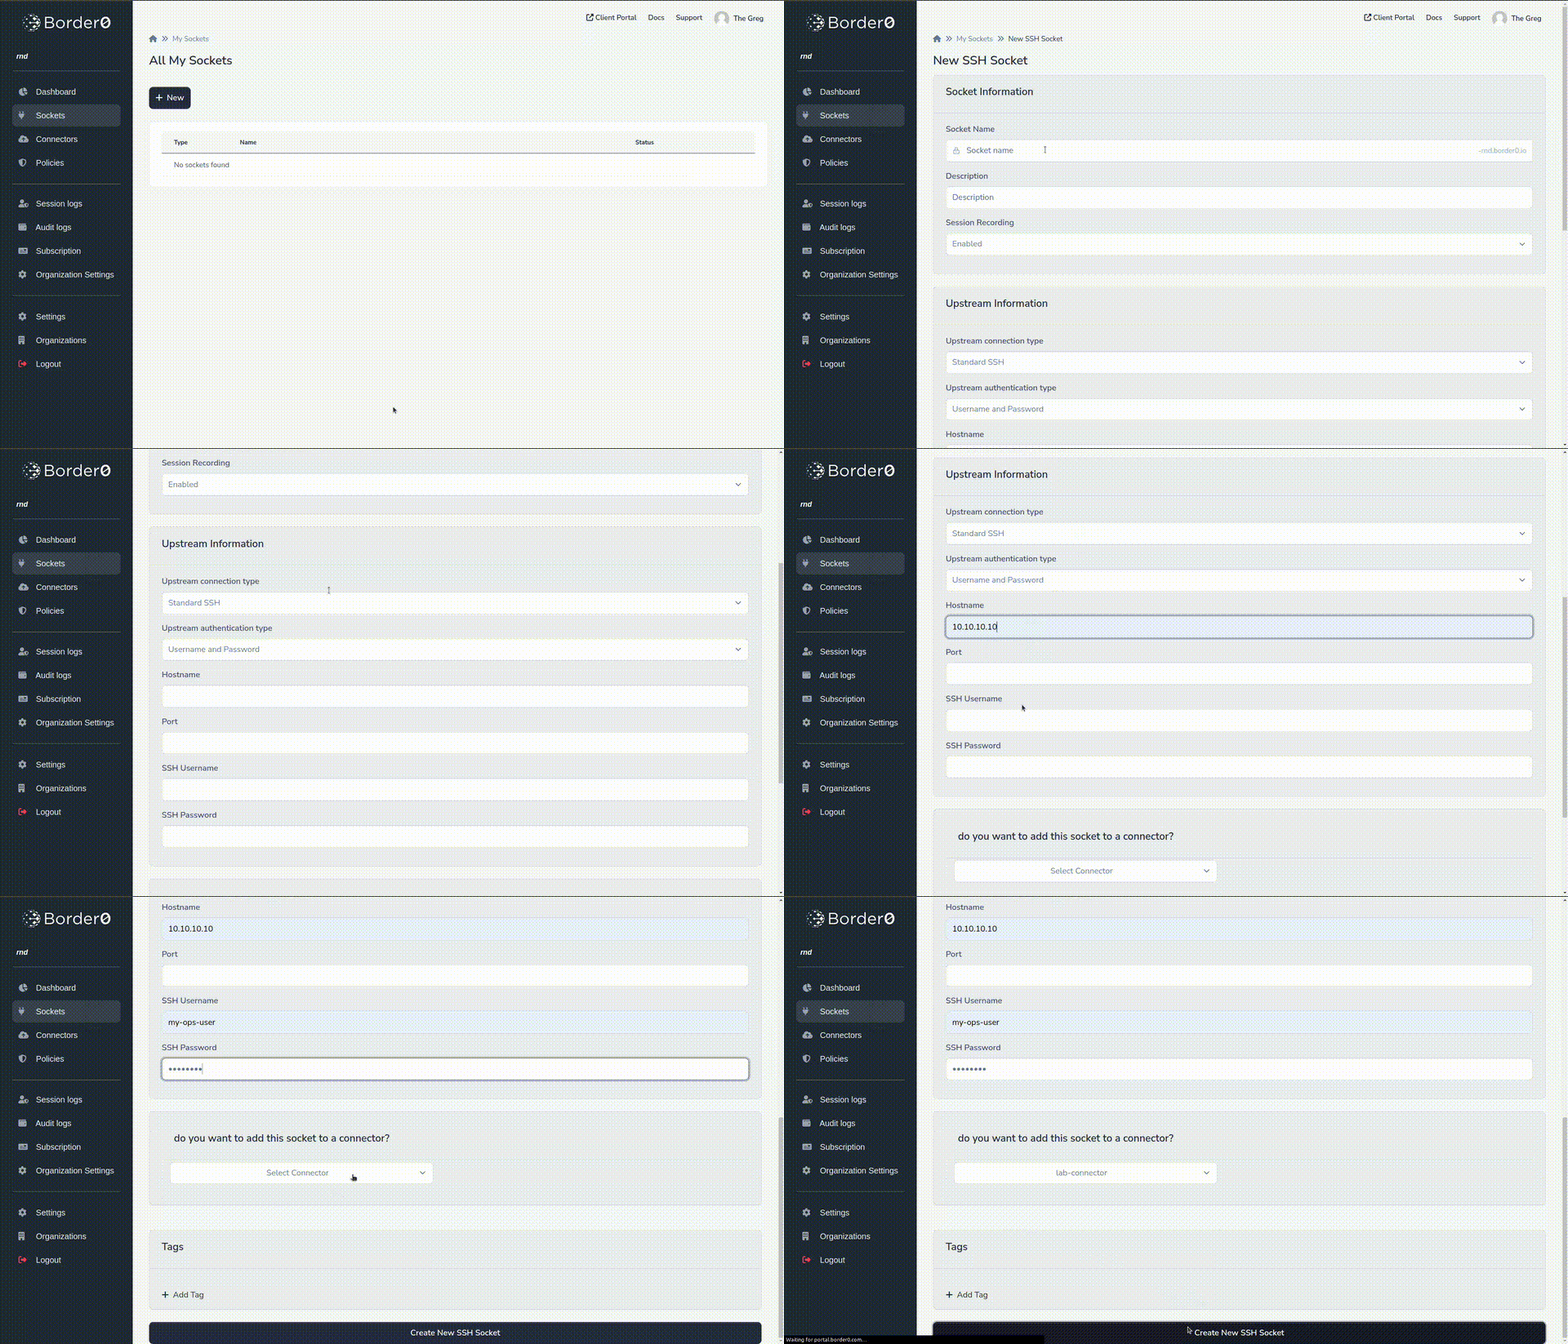
This section guides you through creating an SSH socket using username and password authentication and linking it to your connector.
- In the Sockets page, click on new SSH socket
- Set a name and, optionally, a description
- Session recording is enabled by default; you can deactivate it if you'd like.
Upstream Information
Here we configure how your connector can connect and authenticate to the upstream SSH server.
- Select Standard SSH for connection type
- For authentication select username and password.
- Hostname and Port: Enter the target server's hostname or IP address (e.g.,
10.10.10.10) and port (default: 22). - Credentials, in our example we used ops-user as the username and mySuperSecretPw as the password.
- For more secure ways of dealing with credentials click here
- Connector: Select the appropriate connector from the list.
That's it; now click the create new SSH socket button. And your new SSH socket has been created, and you should have access to your SSH server.

Troubleshooting
Should you see any issues with your new socket, it's typically because it can't connect to the upstream SSH server. Common use-cases are, connector not being able to communicate with the provided hostname and port number, or, invalid credentials. To troubleshoot that take a look at the connector logs as described here
A typical example is a log like below, indicating the connector can't reach the target upstream host on 10.10.10.10:22.
{"msg":"failed to handle channels: unable to connect to upstream host: dial tcp 10.10.10.10:22: i/o timeout","socket_id":"fc442ec1-9108-4d6f-b564-2fa86a43998f"}Another typical issues may the one below. This indicates the username and password combination didn't work and couldn't be used to authenticate
{"msg":"failed to handle channels: unable to connect to upstream host: ssh: handshake failed: ssh: unable to authenticate, attempted methods [none], no supported methods remain","socket_id":"fc442ec1-9108-4d6f-b564-2fa86a43998f"}
Test authentication manuallyIf you see upstream connectivity errors in the logs, make sure to try to connect manually from the connector, using the username, password and host. Make sure to validate the username and password combination like this (it will force username/password based auth)
ssh -o PreferredAuthentications=password -o PubkeyAuthentication=no [email protected]Also make sure your sshd config file on the target server has password authentication enabled, by checking that
/etc/ssh/sshd_confighas this line:PasswordAuthentication yes
If that doesn't help resolve the issue, feel free to contact us, and we'd be happy to help you troubleshoot.
2 -Key-Based Authentication
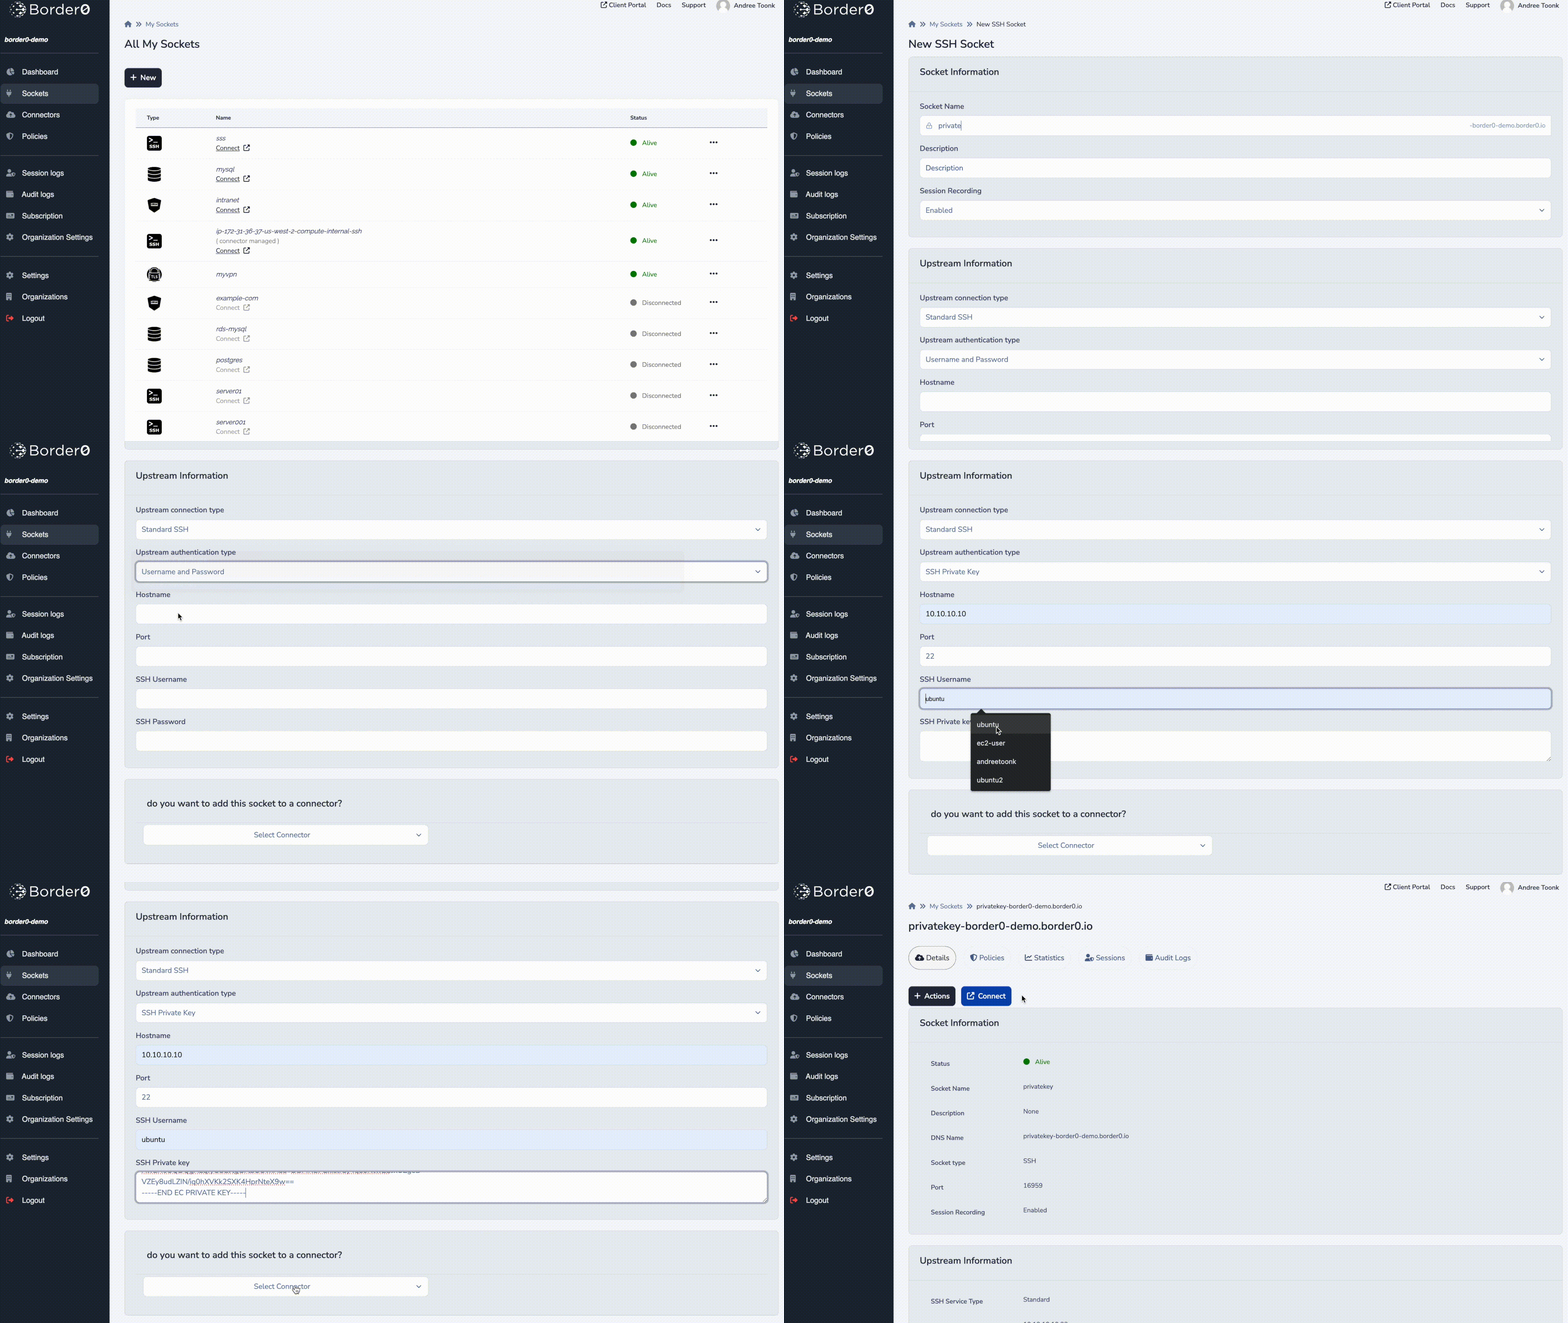
This section details creating an SSH socket using SSH private key authentication.
- In the Sockets page, click on new SSH socket
- Set a name and, optionally, a description
- Session recording is enabled by default; you can deactivate it if you'd like.
Upstream Information
Here we configure how your connector can connect and authenticate to the upstream SSH server.
- Select Standard SSH for connection type
- For authentication select SSH Private Key.
- Hostname and Port: Enter the target server's hostname or IP address (e.g.,
10.10.10.10) and port (default: 22). - Credentials, in our example we used ubuntu as the username. Next paste your private SSH key in the SSH private Key field.
- For more secure ways of dealing with credentials click here
- Connector: Select the appropriate connector from the list.

Creating an SSH socket with Key based authentication
Troubleshooting
Should you see any issues with your new socket, it's typically because it can't connect to the upstream SSH server. Common use-cases are, connector not being able to communicate with the provided hostname and port number, or, invalid credentials. To troubleshoot that take a look at the connector logs as described here
A typical example is a log like below, indicating the connector can't authenticate using the private key provided. In that case, make sure to validate that the username and private key are correct.
{"msg":"failed to handle channels: unable to connect to upstream host: ssh: handshake failed: ssh: unable to authenticate, attempted methods [none publickey], no supported methods remain","socket_id":"fc442ec1-9108-4d6f-b564-2fa86a43998f"}
Test authentication manuallyIf you see upstream connectivity errors in the logs, make sure to try to connect manually from the connector, using the username, private key and host provided in the config. Make sure to validate the username and private combination like below (it will force key based auth)`
ssh -i ~/.ssh/id_rsa -o PreferredAuthentications=publickey -o IdentitiesOnly=yes [email protected]And restart sshd after any changes to your ssh configuration. In Ubuntu this can be done with
sudo systemctl restart ssh.service
Also see this guide for How To Configure SSH Key-Based Authentication on a Linux Server
If that doesn't help resolve the issue, feel free to contact us, and we'd be happy to help you troubleshoot.
3 -SSH Certificate Based Authentication
Border0 can further simplify secure SSH access by issuing SSH certificates to your connector, eliminating the need for traditional SSH passwords or private keys. To enable this, configure your target (upstream) SSH server to trust certificates signed by the Border0 Certificate Authority (CA).
Key BenefitStreamlined credential management: No need to store or manage SSH passwords or private keys on your connector.
Border0's built-in CA facilitates passwordless and keyless authentication to upstream SSH servers. However, the target SSH server must be configured to recognize certificates signed by Border0.
Prerequisite: Configuring the Target OpenSSH Server
The first step is to find the Border0 SSH CA from the border0 portal, you can find it in the portal under: "Organization Settings > Details" . It will look something like this:

The following changes are needed on the remote SSH server to have it accept SSH certificates signed by Border0.
Create a file named /etc/ssh-ca.pub on the target server and paste the copied CA certificate into it.
Now that we have the SSH CA file on the target machine, it's time to update the OpenSSH configuration to trust the Border0 Certificate authority. Follow the step below.
# Configure OpenSSH to use trust the Border0 Certificate authority
sudo echo "TrustedUserCAKeys /etc/ssh-ca.pub" >>/etc/ssh/sshd_config

# We look for a certain principle in the signed certificates.
# The below allows any system user to authenticate using signed certificates
sudo echo "AuthorizedPrincipalsFile /etc/ssh/authorized_principals" >>/etc/ssh/sshd_config
sudo echo "border0_ssh_signed" > /etc/ssh/authorized_principals

# We can also limit which users should be allowed to use ssh certificates to authenticate like this
# sudo echo "AuthorizedPrincipalsFile %h/.ssh/authorized_principals" >>/etc/ssh/sshd_config
# Only allow user ubuntu
# sudo echo "border0_ssh_signed" > /home/ubuntu/.ssh/authorized_principals

# Make sure to reload sshd:
sudo service ssh reload
After these configuration changes, the target SSH server will accept Border0-signed certificates.
Creating an SSH Socket with Certificate Authentication:
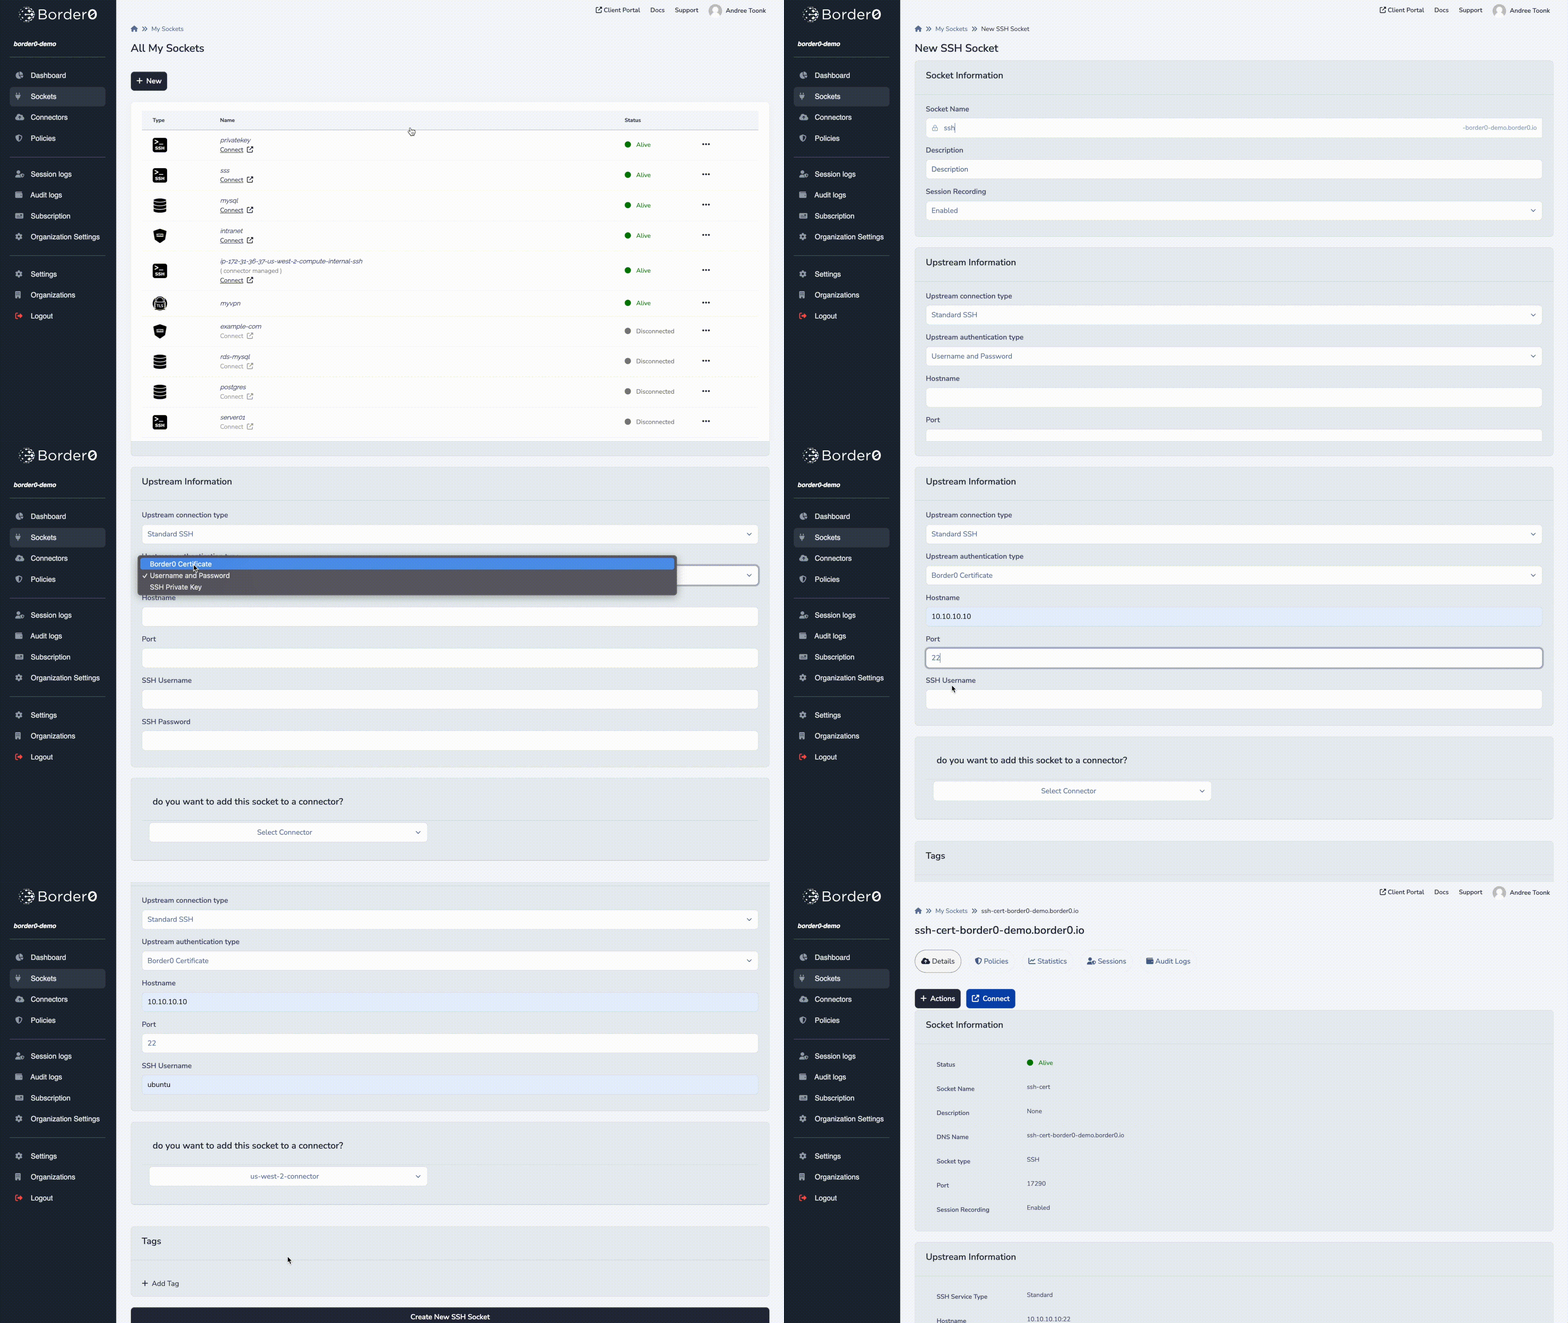
In this example we'll create an SSH socket, select Border0 Certificate as the authentication strategy, and link the newly created SSH socket to our connector.
- In the Sockets page, click on new SSH socket
- Set a name and, optionally, a description
- Session recording is enabled by default; you can deactivate it if you'd like.
Upstream Information
Here we configure how your connector can connect and authenticate to the upstream SSH server.
- Select Standard SSH for connection type
- For authentication select Border0 Certificate.
- Hostname and Port: Enter the target server's hostname or IP address (e.g.,
10.10.10.10) and port (default: 22). - Username, in our example we use ubuntu as the username.
- Connector: Select your connector from the list

Troubleshooting
Should you see any issues with your new socket, it's typically because it can't connect to the upstream SSH server. Common use-cases are, connector not being able to communicate with the provided hostname and port number, or, invalid credentials. To troubleshoot that take a look at the connector logs as described here
If that doesn't help resolve the issue, feel free to contact us, and we'd be happy to help you troubleshoot.
Updated 6 months ago
