
Access to a MongoDB server
🛡️ Intro
In this example, we'll secure access to an Mongodb server using Border0. We support regular Mongodb servers as well AWS Document store.
We'll walk through the following steps together:
- Launch an Mongodb server using Docker
- Create a Mongodb socket and link it to our connector
- Authenticate and connect
- Watch the recording
- Use the Border0 Desktop app to access your database
1 - Run a local Mongodb server with Docker
You can make any MongoDB server available with Border0; for testing purposes, we'll use an MongoDB Docker container as the server.
It works through NAT and FirewallsDon't worry if your laptop is behind NAT. Border0 works perfectly fine with resources that are behind NAT.
docker run -d --rm \
   --name mongodb-server \
   -p 27017:27017 \
   -e MONGO_INITDB_ROOT_USERNAME=admin \
   -e MONGO_INITDB_ROOT_PASSWORD=My-secret-pw \
 mongo:latest
This command starts an MongoDB server with My-secret-pw as the password.
Before we continue, let's make sure the MongoDB container started OK and test connecting to the server locally as user admin with password My-secret-pw:
mongosh "mongodb://admin:[email protected]:27017/admin"Once connected, we can insert some data as shown below:
db.users.insertMany([ { name: "Alice", age: 28 }, { name: "Bob", age: 35 }] );Then, test whether the document was inserted properly by querying for it:
admin> db.users.find({ name: "Alice" });
[
  { _id: ObjectId('6872e0c2cf42d322d02357ee'), name: 'Alice', age: 28 }
]
2 - Create an MongoDB socket and link it to your connector.
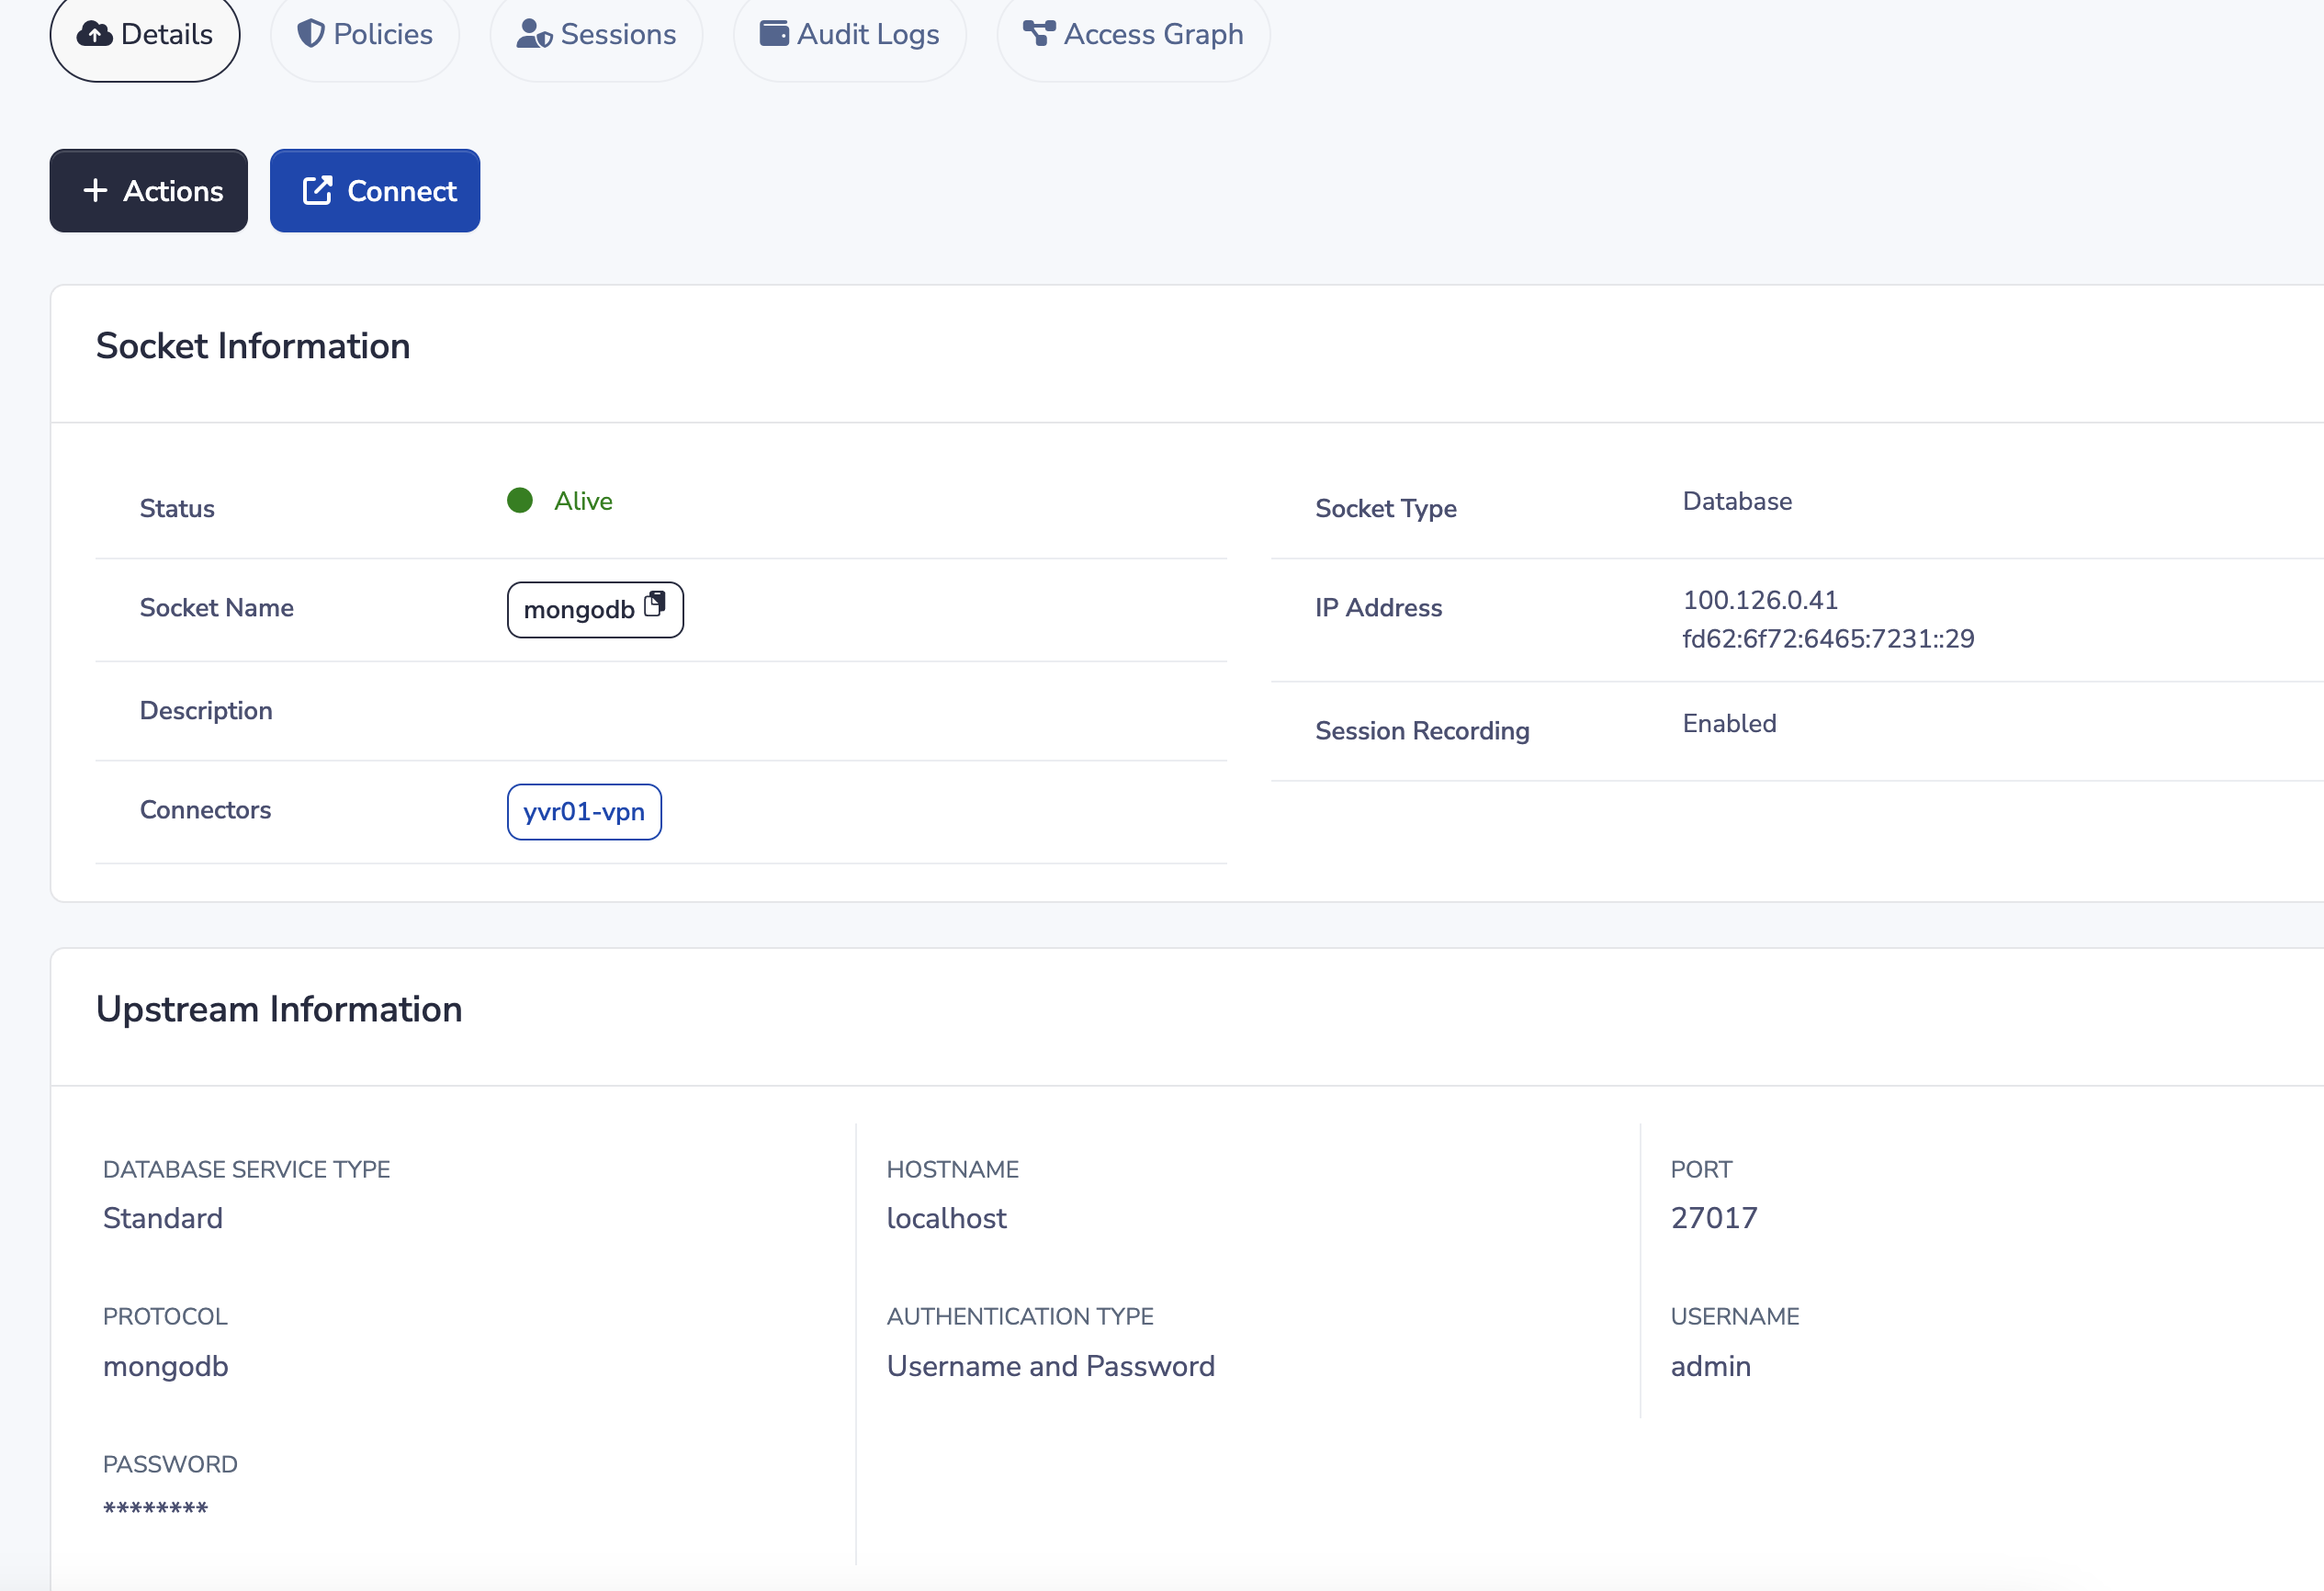
Now that we have a working MongoDB server for our example, it's time to create an MongoDB socket and link it to our connector.
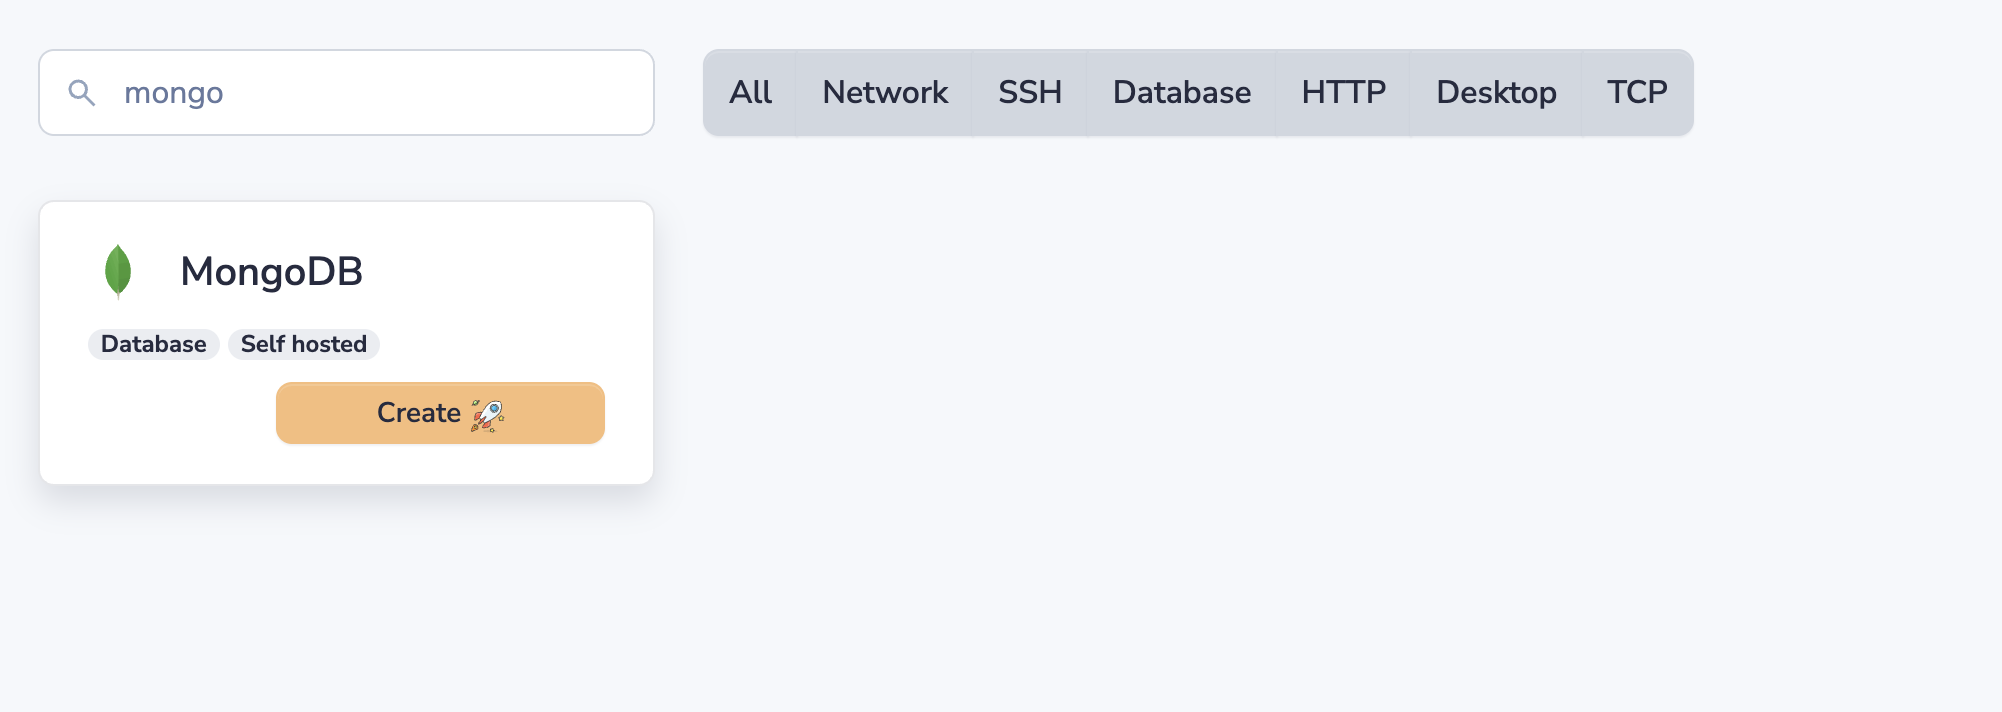
- In the Sockets page, click on Add New Socket and select MongoDB.
- Set a name and, optionally, a description.
Upstream Configuration
Here we can configure how your connector connects and authenticates to the upstream server.
- Select standard for Service type.
- For our example, we'll use the hostname localhost and port 27017. Adjust as needed for your environment.
- For authentication we can use "Username and Password", but we also support TLS, No Auth and for AWS IAM.
- Credentials, in our example we used admin and My-secret-pw Adjust as needed for your environment.
- Connector: Select your connector from the list.
That's it, now click the Create New Socket button. You should now have access to your MongoDB server.
Securing your credentialsIn this example, we provided the credentials directly to the Border0 API. These credentials are needed for the connector running in your environment to establish a secure upstream connection to the server. While Border0 stores these credentials in encrypted form, we strongly recommend that you keep them local to the connector.
You can have the Border0 connector integrated with your secret management solution for enhanced security and keep your secrets local. Learn more about this in our guide:https://docs.border0.com/docs/using-secret-managers-to-store-credentials
If you experience any issues with your new socket, it's typically because it can't connect to the upstream database. To troubleshoot, take a look at the connector logs as described here
3 - Connecting to Your MongoDB Server
Next up, let's connect to our MongoDB server through Border0.
Using policies to control access to MongoDB serversControlling access to MongoDB servers can be achieved using Border0 policies. For MongoDB specifically, make sure to enable database permissions in your policy.
When configuring database permissions for MongoDB, the following query types are supported:
- ReadOnly -- allows only read operations such as queries and aggregations. Aggregate pipelines that write data (using $out or $merge) are blocked.
- ReadWrite -- allows all operations.
- INSERT, UPDATE, DELETE -- can be used individually to allow specific write operations.
Other query types available in the policy (such as SELECT, DDL, BEGIN, etc.) are designed for SQL databases and do not apply to MongoDB. Collection-level and document-level restrictions are not currently supported.
For the fastest and most seamless experience, use our desktop app. It simplifies the process of discovering and connecting to your Mongo databases with your preferred database client..
Launch access using the Border0 desktop app
Using the Command-Line Interface (CLI)
For advanced users or those who prefer the CLI, you can use the border0 CLI tool
- List available databases: Use the
border0 client dbcommand to list all databases you have access to - Select your Mongo database
- Select your preferred client: The CLI will display a list of supported clients, including:
- mongosh
- MongoDB Compass
- DBeaver
- DataGrip
- TablePlus
border0 client db
If your favorite client is not listed, you can always connect with your client of choice, simply use the socket name as the server name.
4 - Review Session Details and Recordings
To review your MongoDB session, open the Border0 portal and select the corresponding database socket. Go to the Sessions tab and find your session. Clicking on the session will display a recording of the activity. This recording details the SSO identity used (who connected), the originating IP address, the device, connection time, and a complete log of all executed queries.
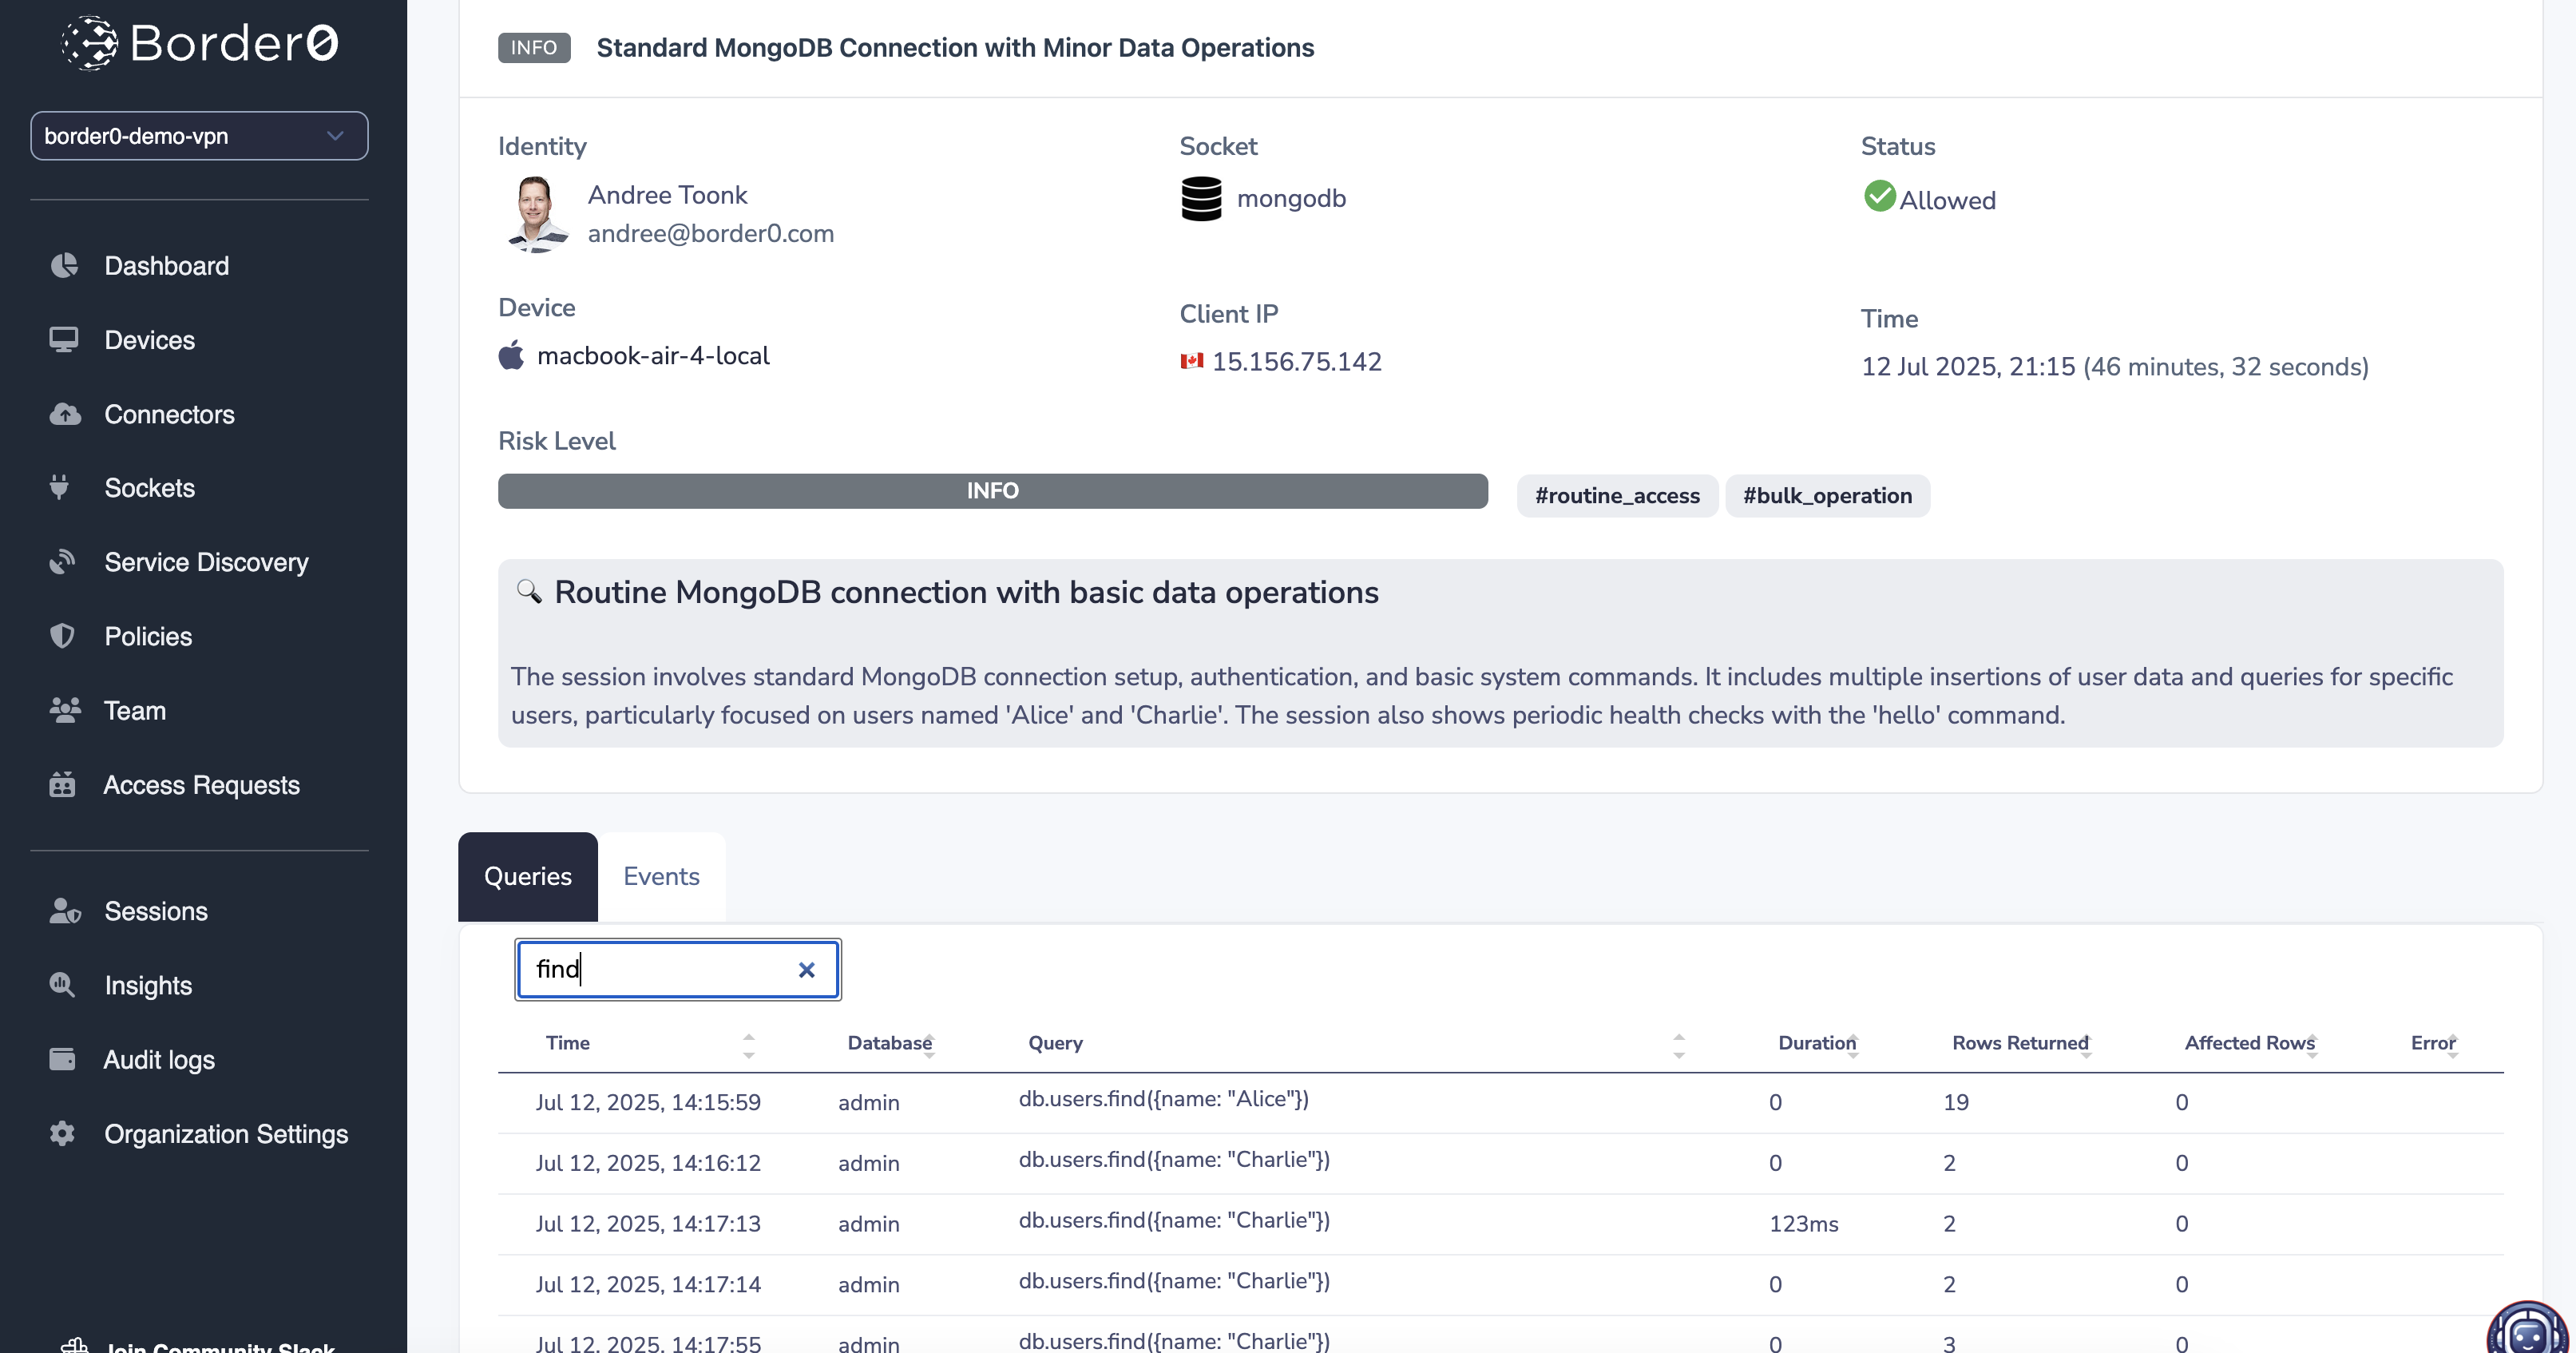
MongoDB Session recording in Border0 portal
5- AWS DocumentDB
Amazon DocumentDB supports IAM-based authentication as a way to securely connect to your cluster without managing static passwords. This fits well with Border0’s secure connectivity model.
To access your DocumentDB cluster using Border0 and IAM authentication, follow these steps:
Create an IAM-Authenticated MongoDB User
DocumentDB requires the MongoDB user inside the DB to exactly match the IAM identity (user or role) you’ll be connecting with. Run this using mongosh against your cluster:
First, make sure to use the database $external
use $externalThe create the new user
db.createUser({
  user: "arn:aws:iam::ACCOUNT_ID:role/ROLE_NAME",
	mechanisms: ["MONGODB-AWS"],
  roles: [{ role: "readWriteAnyDatabase", db: "admin" }]
})
Replace ACCOUNT_ID, ROLE_NAME, or USERNAME with your actual values.
📝 Note: $external is the required database name for IAM-based users.
Tip: you can request the role and account id for a given EC2 instance with this handy command:
aws sts get-caller-identity
[ec2-user@ip-172-31-20-112 ~]$ aws sts get-caller-identity
{
    "UserId": "VRO1A2PC3KSGXDE7TOK:i-06ebf522eef8643d5",
    "Account": "847817323XXX",
    "Arn": "arn:aws:sts::847817323XXX:assumed-role/border0-connector-example-ConnectorInstanceRole-q8Pwaineqdhn/i-06ebf522eef8643d5"
}
So an example is for account 847817323XXX where the ec2 connector has the role: border0-connector-example-ConnectorInstanceRole
db.createUser({
  user: "arn:aws:iam::847817323XXX:role/border0-connector-example-ConnectorInstanceRole",
  mechanisms: ["MONGODB-AWS"],
  roles: [
    { role: "readWrite", db: "admin" }
  ]
});
Validate if the user was created succesfully (make sure you're in $external)
rs0 [direct: primary] $external> show users;
[
  {
    _id: 'arn:aws:iam::847817323XXX:role/border0-connector-example-ConnectorInstanceRole',
    user: 'arn:aws:iam::847817323XXX:role/border0-connector-example-ConnectorInstanceRole',
    db: '$external',
    roles: [ { db: 'admin', role: 'readWrite' } ]
  }
]
rs0 [direct: primary] $external>
Note, after you apply the above, this should work from the connector:
mongosh docdb-2025-07-01-21-44-53.cluster-ccactp3xmplp.us-east-1.docdb.amazonaws.com:27017 \
  --tls --tlsCAFile global-bundle.pem \
  --retryWrites=false \
  --authenticationMechanism MONGODB-AWS \
  --authenticationDatabase '$external'
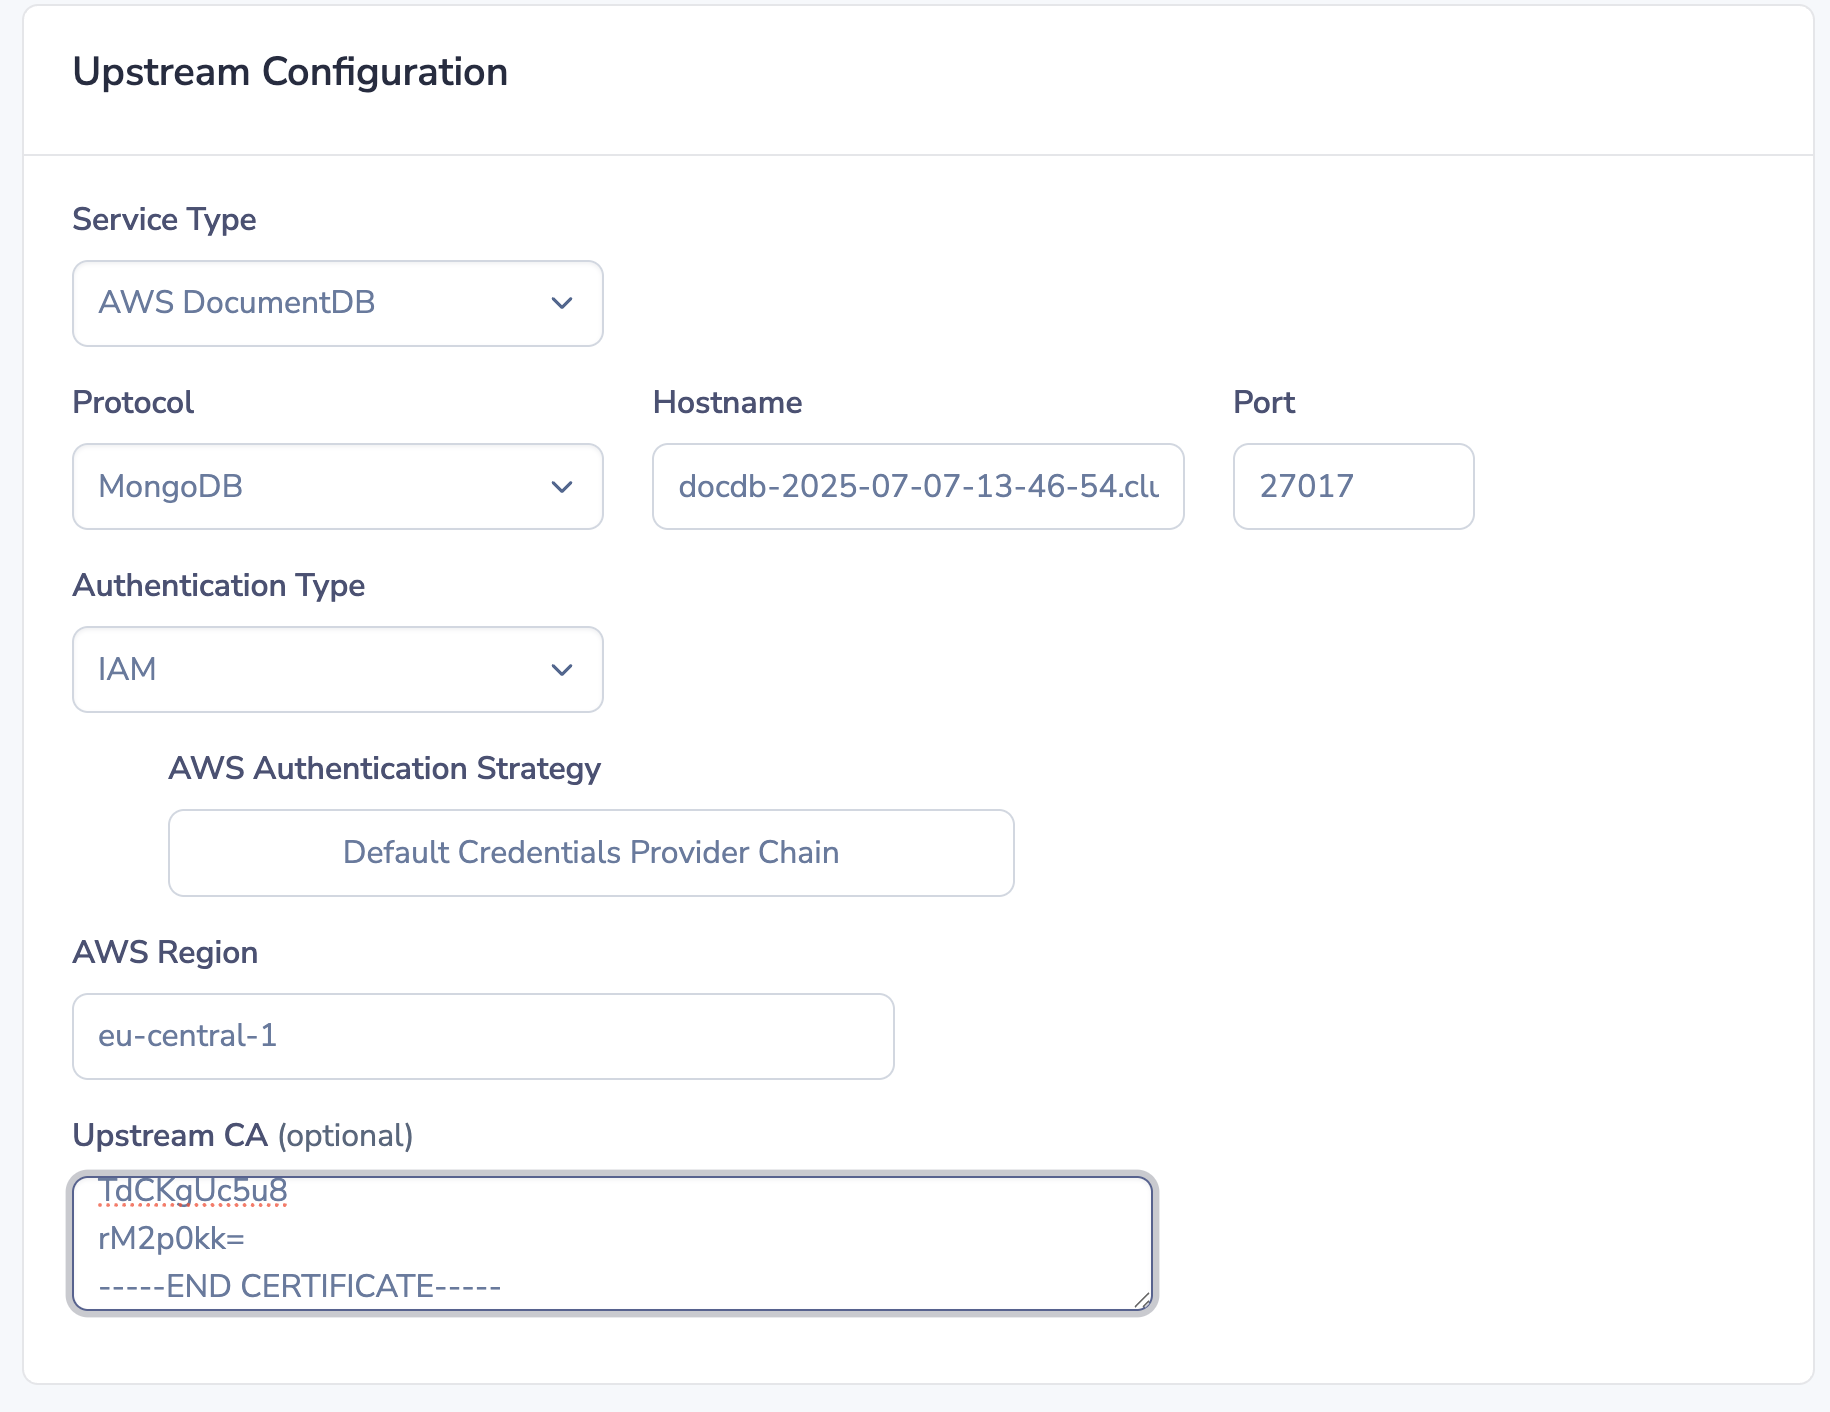
Border0 Upstream Configuration
Once your IAM user is configured in DocumentDB, go to your Border0 portal and create a new mongodb database socket and set up the Upstream Configuration.
You can reference the screenshot below for guidance, note upstream CA is optional.
6 - MongoDB Atlas
Border0 also supports MongoDB Atlas as a first-class upstream service type.
Before creating a MongoDB Atlas socket, ensure the following:
• You have an existing MongoDB Atlas cluster
• You have a database user already configured in Atlas
• Your Atlas cluster is reachable from the network where the Border0 connector runs
In the portal create a new database socket of type "MongoDB Atlas":

# Troubleshooting
Should you see any issues with your new socket, it's typically because it can't connect to the upstream database. To troubleshoot that take a look at the connector logs as described here
If that doesn't help resolve the issue, feel free to contact us, and we'd be happy to help you troubleshoot.
$ mongosh "mongodb://mongodb:27017/admin"

Current Mongosh Log ID:	6872e243005eed0fcb73fe07
Connecting to:		mongodb://mongodb:27017/admin?directConnection=true&appName=mongosh+2.3.8
Using MongoDB:		8.0.4
Using Mongosh:		2.3.8
mongosh 2.5.5 is available for download: https://www.mongodb.com/try/download/shell

For mongosh info see: https://www.mongodb.com/docs/mongodb-shell/


admin> db.users.find({ name: "Bob" });
[
  {
    _id: ObjectId('683df902aefc3d5f9f586dc5'),
    name: 'Bob',
    age: 38,
    email: '[email protected]',
    city: 'Toronto'
  },
  {
Updated 5 months ago