
FAQ
Frequently asked questions
How about Ansible Tower/AWX?
Absolutely! We are big fans of automation and at scale! Ansible AWX article explains Border0 enriched AWX deployment.
What database clients does Border0 support?
Border0 integrates with a various database clients allowing for quick launch of your preferred client. This means you can use the border0 client to discover all database you have access to as a client, and Border0 can help you start your favorite database client with the correct configuration. Currently the following database clients are supported:
- mysql
- mysqlworkbench
- mycli
- dbeaver
- datagrip
- psql
- pgcli
- cockroach sql
- pgadmin
- tableplus
Note though that you can use any database client, by just configuring it with the socket name as the target server.
Are there any example or sandbox server I can connect to?
Absolutely! To help you get hands-on experience with Border0, we offer a variety of sandbox servers that serve as Socket origin servers. These servers are designed to let you test different functionalities, including SSH, HTTP, MySQL, and PostgreSQL connections. Below are the details:
| Type | DNS Name | credentials |
|---|---|---|
| SSH | ssh.playground.border0.ioport 22 | username: border0password: Border0<3Ssh |
| HTTP | http.playground.border0.ioport 80 (http) | no auth required |
| MySQL | mysql.playground.border0.ioport 3306 | username: border0password: Border0<3MySql |
| PostgreSQL | psql.playground.border0.ioport 5432 | username: border0password: Border0<3Psql |
| VNC | vnc.playground.border0.ioport 5900 | password: Border0<3VNC |
| RDP | rdp.playground.border0.ioport 3389 | username: border0password: Border0<3RDP |
| TCP Echo | tcp.playground.border0.ioport 9000 | no auth required |
You can use these servers to test various functionalities and configurations of Border0. It's a safe way to understand how the system works and to validate your use-cases. Note these instances will be periodically wiped and are monitored for abuse.
How do I make sure a user has read-only access to my Mysql or Psql database
Using border0 policies you can configure what type of commands, or queries a user is allowed to perform on your mysql or postgres database.
A read only policy would look like this
{
    "permissions": {
        "database": {
            "allowed_databases": [
                {
                    "database": "*",
                    "allowed_query_types": [
                        "ReadOnly"
                    ]
                }
            ]
        }
    },
    "condition": {
        "when": {
            "after": "2022-02-02T22:22:22Z",
            "before": null,
            "time_of_day_after": "00:00 UTC",
            "time_of_day_before": "23:59 UTC"
        },
        "where": {
            "allowed_ip": [
                "0.0.0.0/0",
                "::/0"
            ],
            "country": null,
            "country_not": null
        },
        "who": {
            "email": [
                "[email protected]"
            ]
        }
    }
}
For more information see this section on database policies.
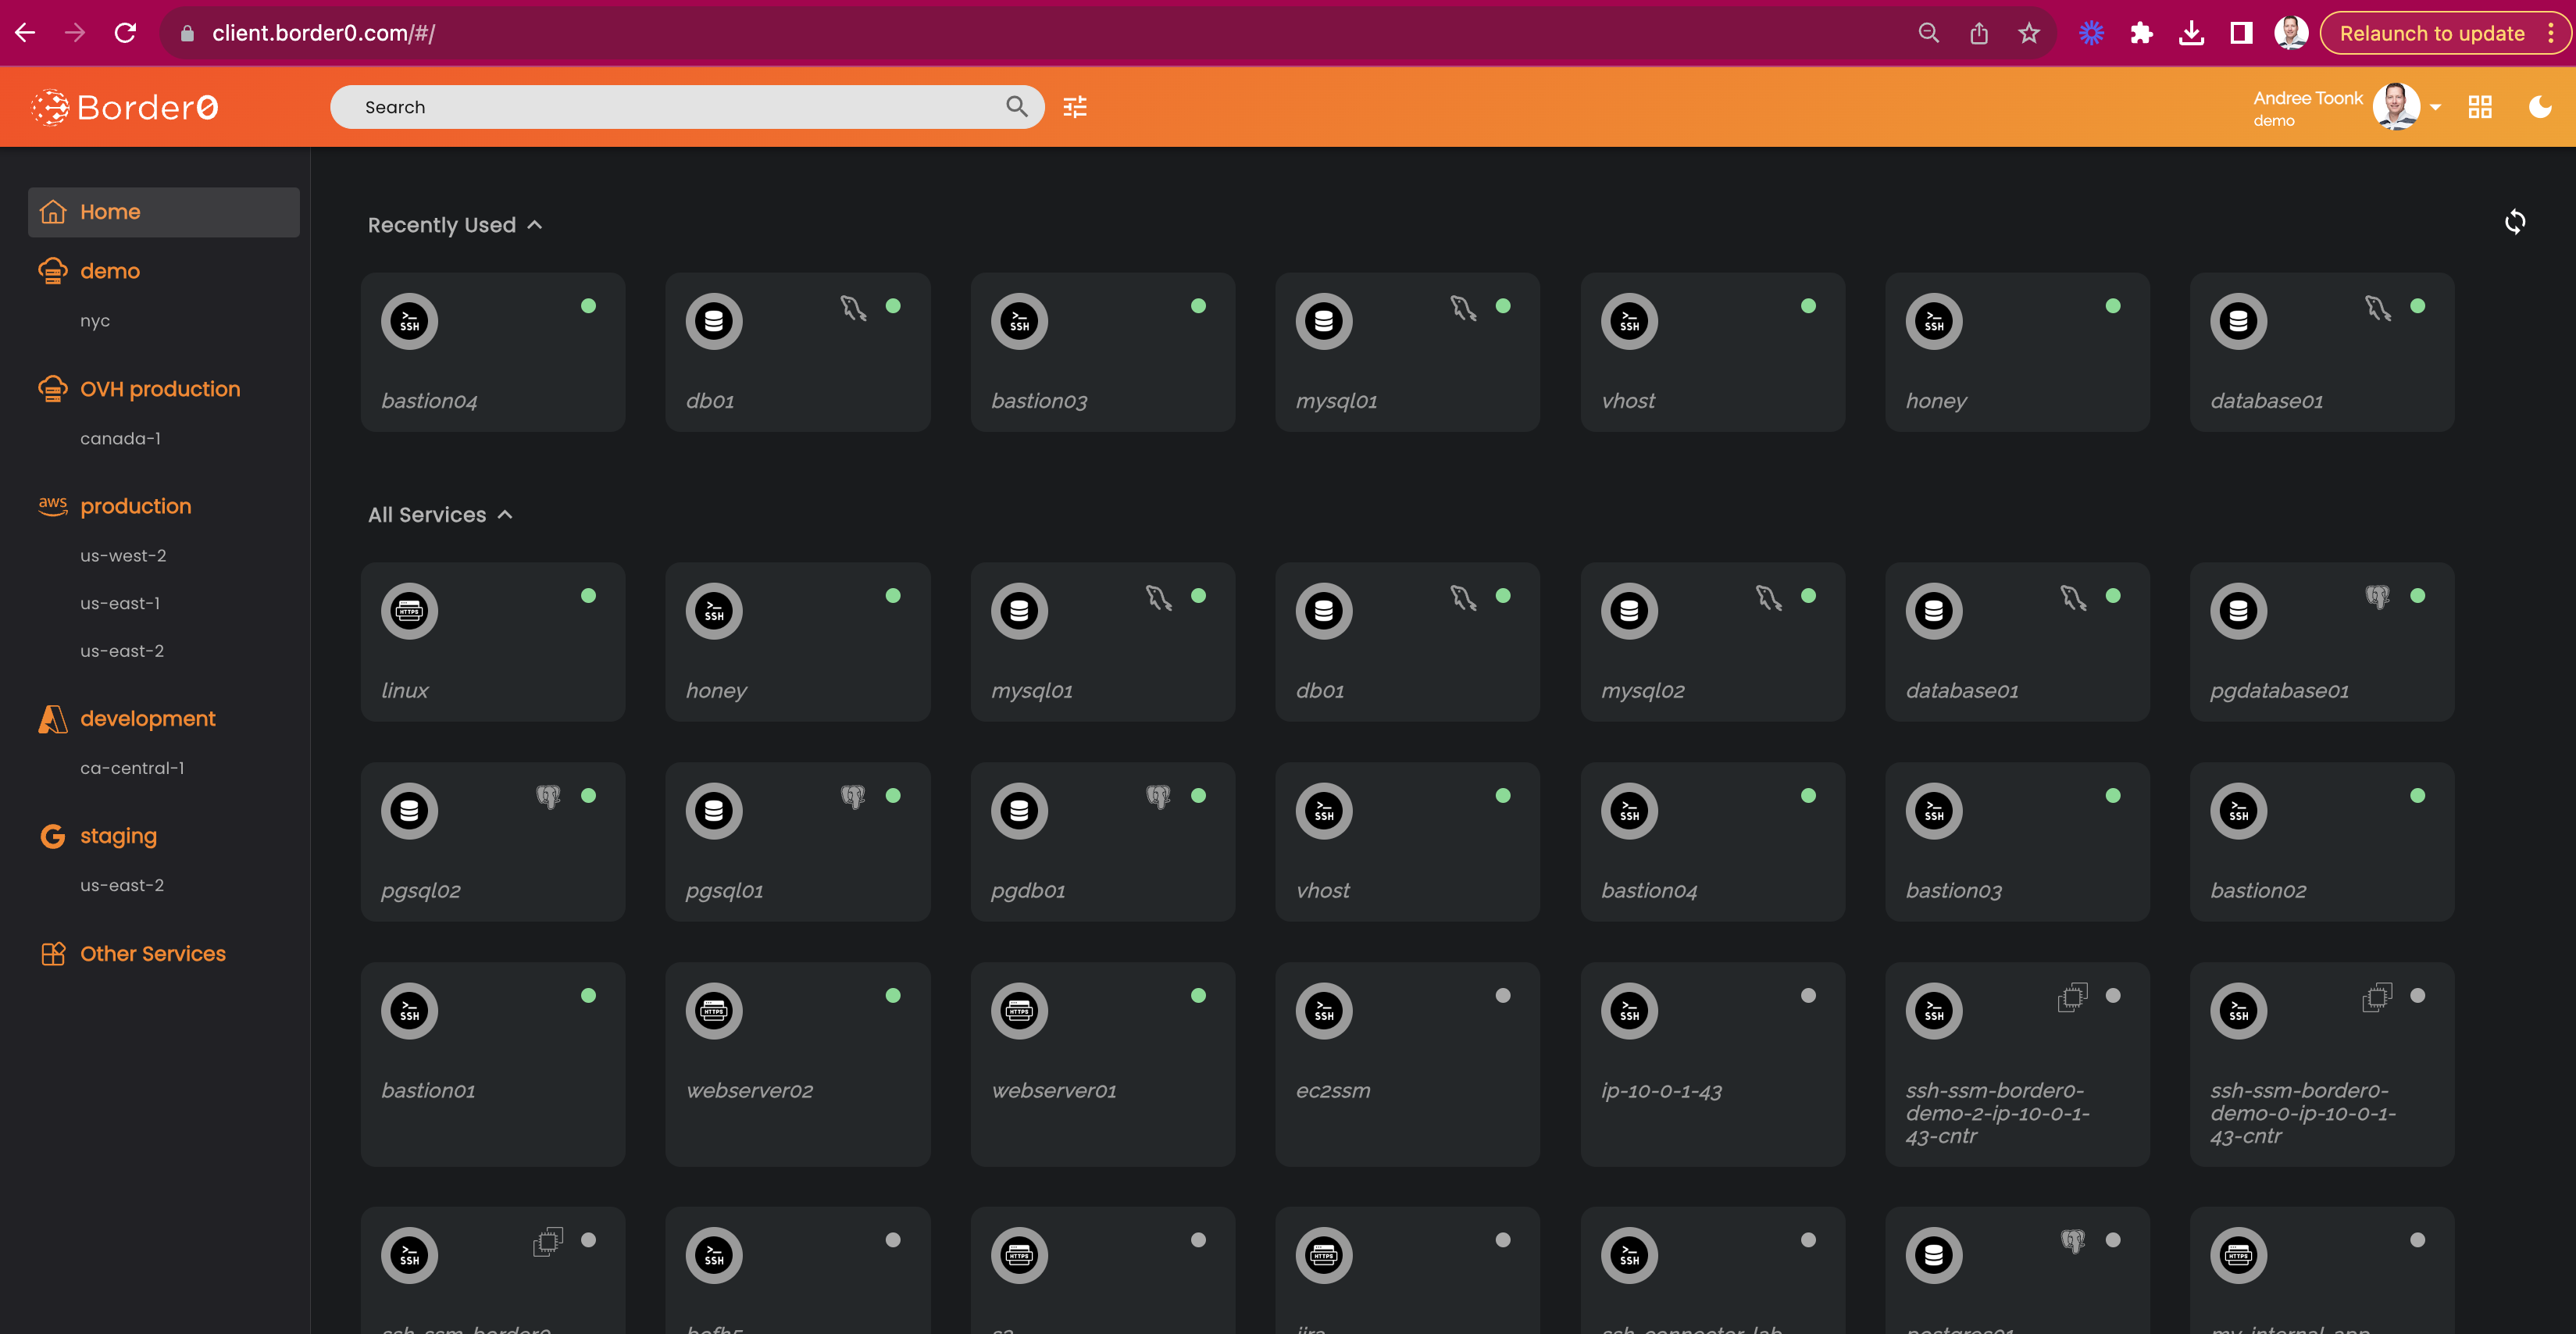
How do I modify the left side menu in client.border0.com?
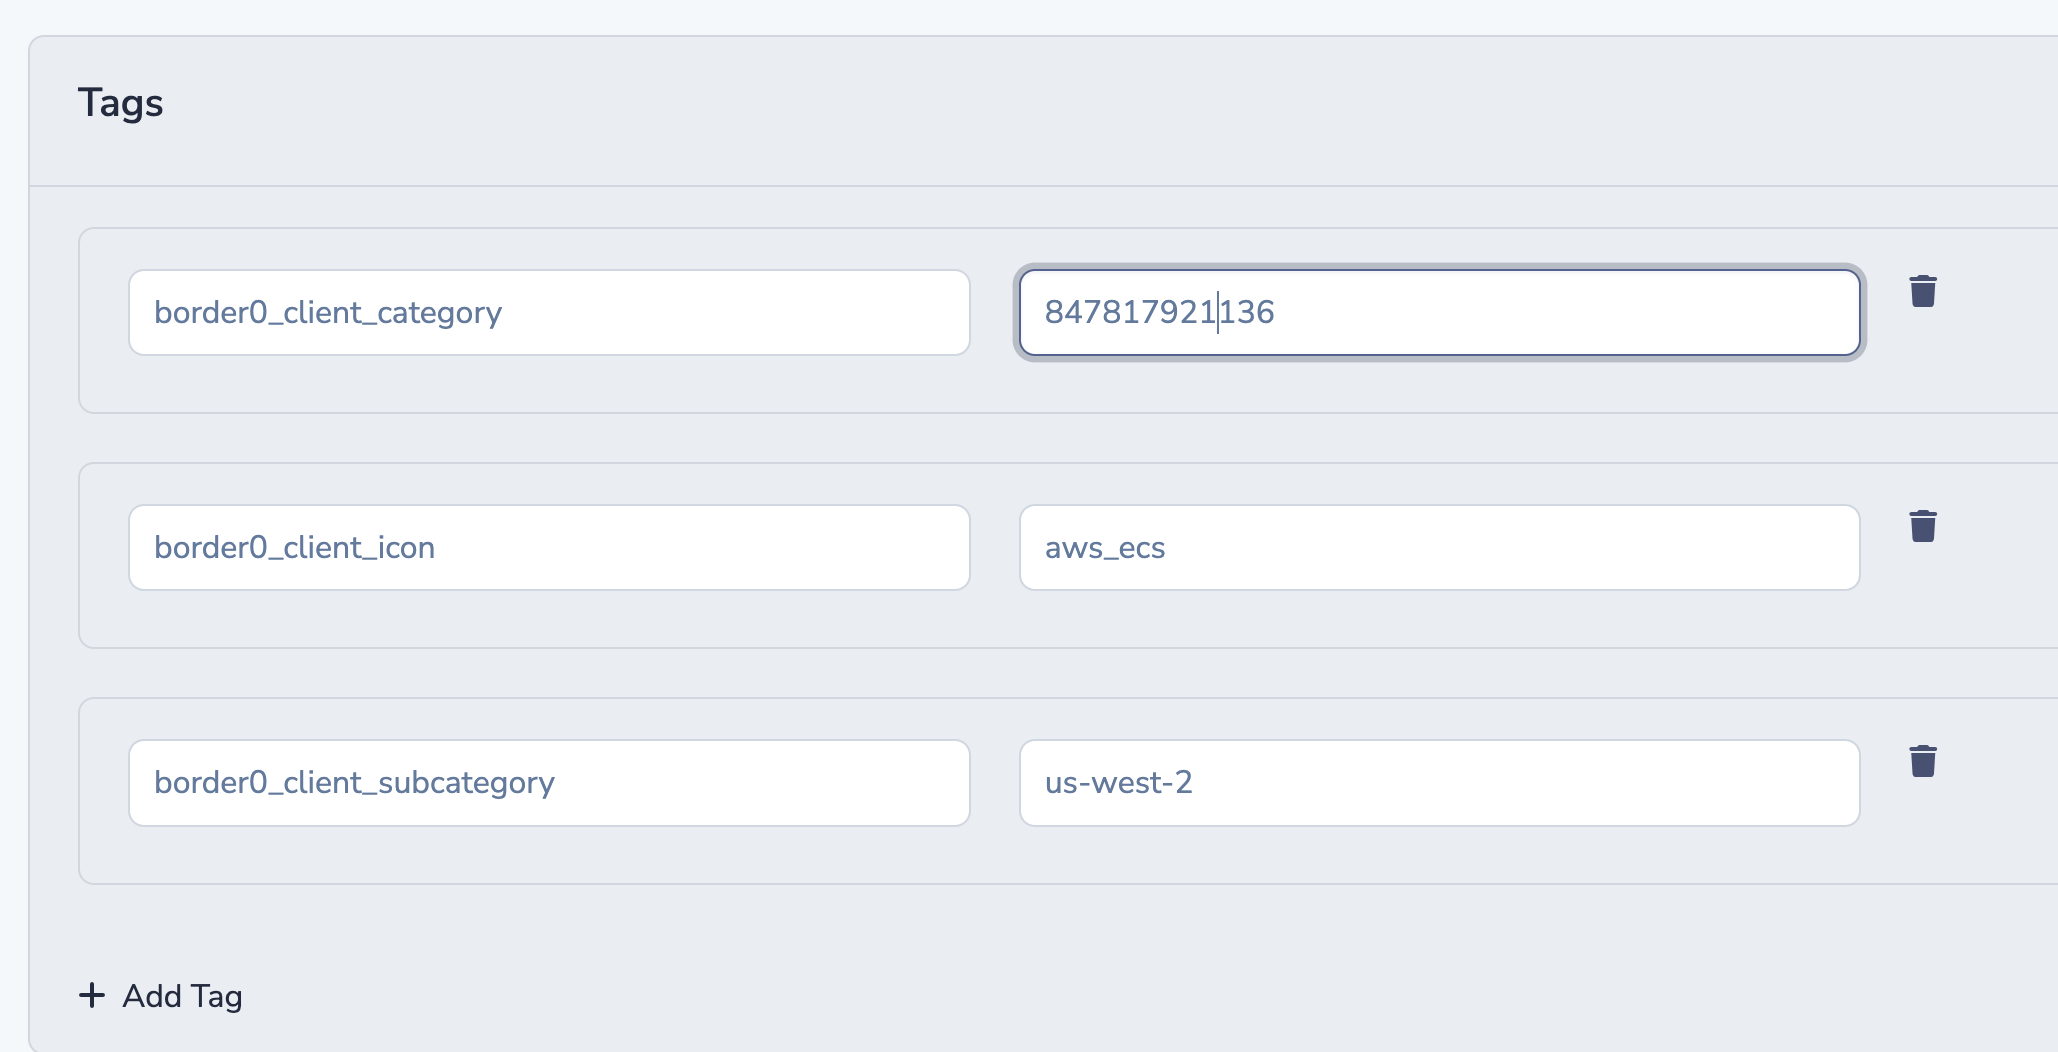
The client portal, as shown below, allows Border0 administrators to group sockets for easy and convenient navigation. The grouping is then represented as the left-side menu, as seen below. Grouping can be modified by adding tags to your sockets. The following tag naming convention is used:
| key | Description |
|---|---|
| border0_client_category | This is the name used as the main categorization. If the it contains the string aws, gcp, google or azure we'll automatically assign the corresponding icon. For any other type, we'll use a generic icon.If the value looks like an AWS account number, then we'll also add an AWS icon. |
| border0_client_subcategory | Is shown as a sub-menu under the border0_client_category item. |
| border0_client_icon | If present, the value of this will be rendered as the icon on the socket tile. The following reserved values will render the corresponding icons: aws_ec2 aws_ecs aws_rds docker kubernetes network mysql postgresqlAlternatively, you can pick any icon name from https://icon-sets.iconify.design/ to be rendered as the icon. For example: octicon:thumbsup-16 |
| border0_client_icon_url | same as border0_client_icon, and can take any img url which will be shown as the icon, Takes precedence over border0_client_icon |
| border0_client_icon_text | This text string will be used as the tooltip text a user sees when hovering over the border0_client_icon (see above). This can be any text string. |
Tags can be added to a Socket at any time by editing the Socket details and add/delete/modify the tags.
Managing tags for Sockets
How do I run the Border0 connector as a Docker container?
Running the connector from a container is easy. As long as the Border0 binary is available on the container and you have a connector token.
First create, create a new connector, or select one from your existing connectors here
From there, navigate to token tab, and create a new token for your connector.
Now you can start the connector like this from Docker.
BORDER0_TOKEN=xxxx border0 connector start You can also use the Border0 Docker image, and use it like this, this basically gives you an instant Bastion host.
$ docker run -ti -e BORDER0_TOKEN=$CONNECTORTOKEN ghcr.io/borderzero/border0 connector startAlternatively, you can store the token in a file, and mount it as a volume, and provide the connetcor with the appropriate config file like below
$ cat ~/config.yaml
token: eyJhbGciOiJIUzI1NiIsInR5cCI6IkpXVCJ-REST_OF-TOKEN

$ docker run -ti -v ~/config.yaml:/etc/border0/config.yaml ghcr.io/borderzero/border0 connector start --config /etc/border0/config.yaml

{"level":"info","ts":"2023-09-13T21:21:11Z","msg":"reading the config","config_path":"/etc/border0.conf"}
{"level":"info","ts":"2023-09-13T21:21:11Z","msg":"starting the connector service"}
{"level":"info","ts":"2023-09-13T21:21:11Z","msg":"connecting to connector server","server":"capi.border0.com:443"}
{"level":"info","ts":"2023-09-13T21:21:12Z","msg":"new socket","socket":"7e4a4fdd-c23c-4b84-9c85-1a9da3498753"}
Welcome to Border0.com
docker-connector-ssh - https://client.border0.com/#/ssh/docker-connector-ssh-border0-demo.border0.io

=======================================================
Logs
=======================================================
I have a web app in a Docker container, how do I make that available?
There are various ways to do this. In this FAQ we'll assume you have a one-off web app, say an internal web app that runs on one container, and you'd like to make it available to your SSO users. To do this we'll run the border0 connector and the webapp in Docker with the help of supervisord. In this example we'll use a simple http python web server that runs on localhost port 12345.
Follow the steps below, Also see this video for video demo of these steps
- create a new connector in the portal
- Create a token for that connector in the portal (token tab) and record the token.
- Create an HTTP socket linked to your connector. Record the Socket name for later. Use the web app as upstream information, in this case
http://localhost:12345 - create a
supervisord.confconfig file that looks like this. This start a python web server and the border0 connector.
[supervisord]
nodaemon=true
[program:python_server]
command=python3 -m http.server 12345
autostart=true
autorestart=true
startretries=3
[program:border0]
command=/border0 connector start --config /etc/border0.yaml
autostart=true
autorestart=true
startretries=3- create a
border0.yamlfile with the token:
token: eyJhbGxxxxx..- Create a
Dockerfile
# Use a base image with Python installed
FROM python:3.8-slim
# Install 'border0' package and supervisord
RUN apt-get update && apt-get install -y supervisor
# Copy our supervisord.conf file from our project directory into the Docker container
COPY supervisord.conf /etc/supervisor/conf.d/supervisord.conf
ADD https://download.border0.com/linux_amd64/border0 /
run chmod a+rx /border0
COPY border0.yaml /etc/border0.yaml
# Run supervisord
CMD ["/usr/bin/supervisord"]
Now build and start the docker container:
docker build . -t border0container
docker run  border0container
Alternatively, you can provide the BORDER0_TOKEN as an enviroment variable to Docker like below. In that case remove --config /etc/border0.yamlfrom the supervisord file.
docker run -e BORDER0_TOKEN=$CONNECTORTOKEN border0containerYour HTTP Service should now be available through border0 using the socket name recorded in step 3 above.
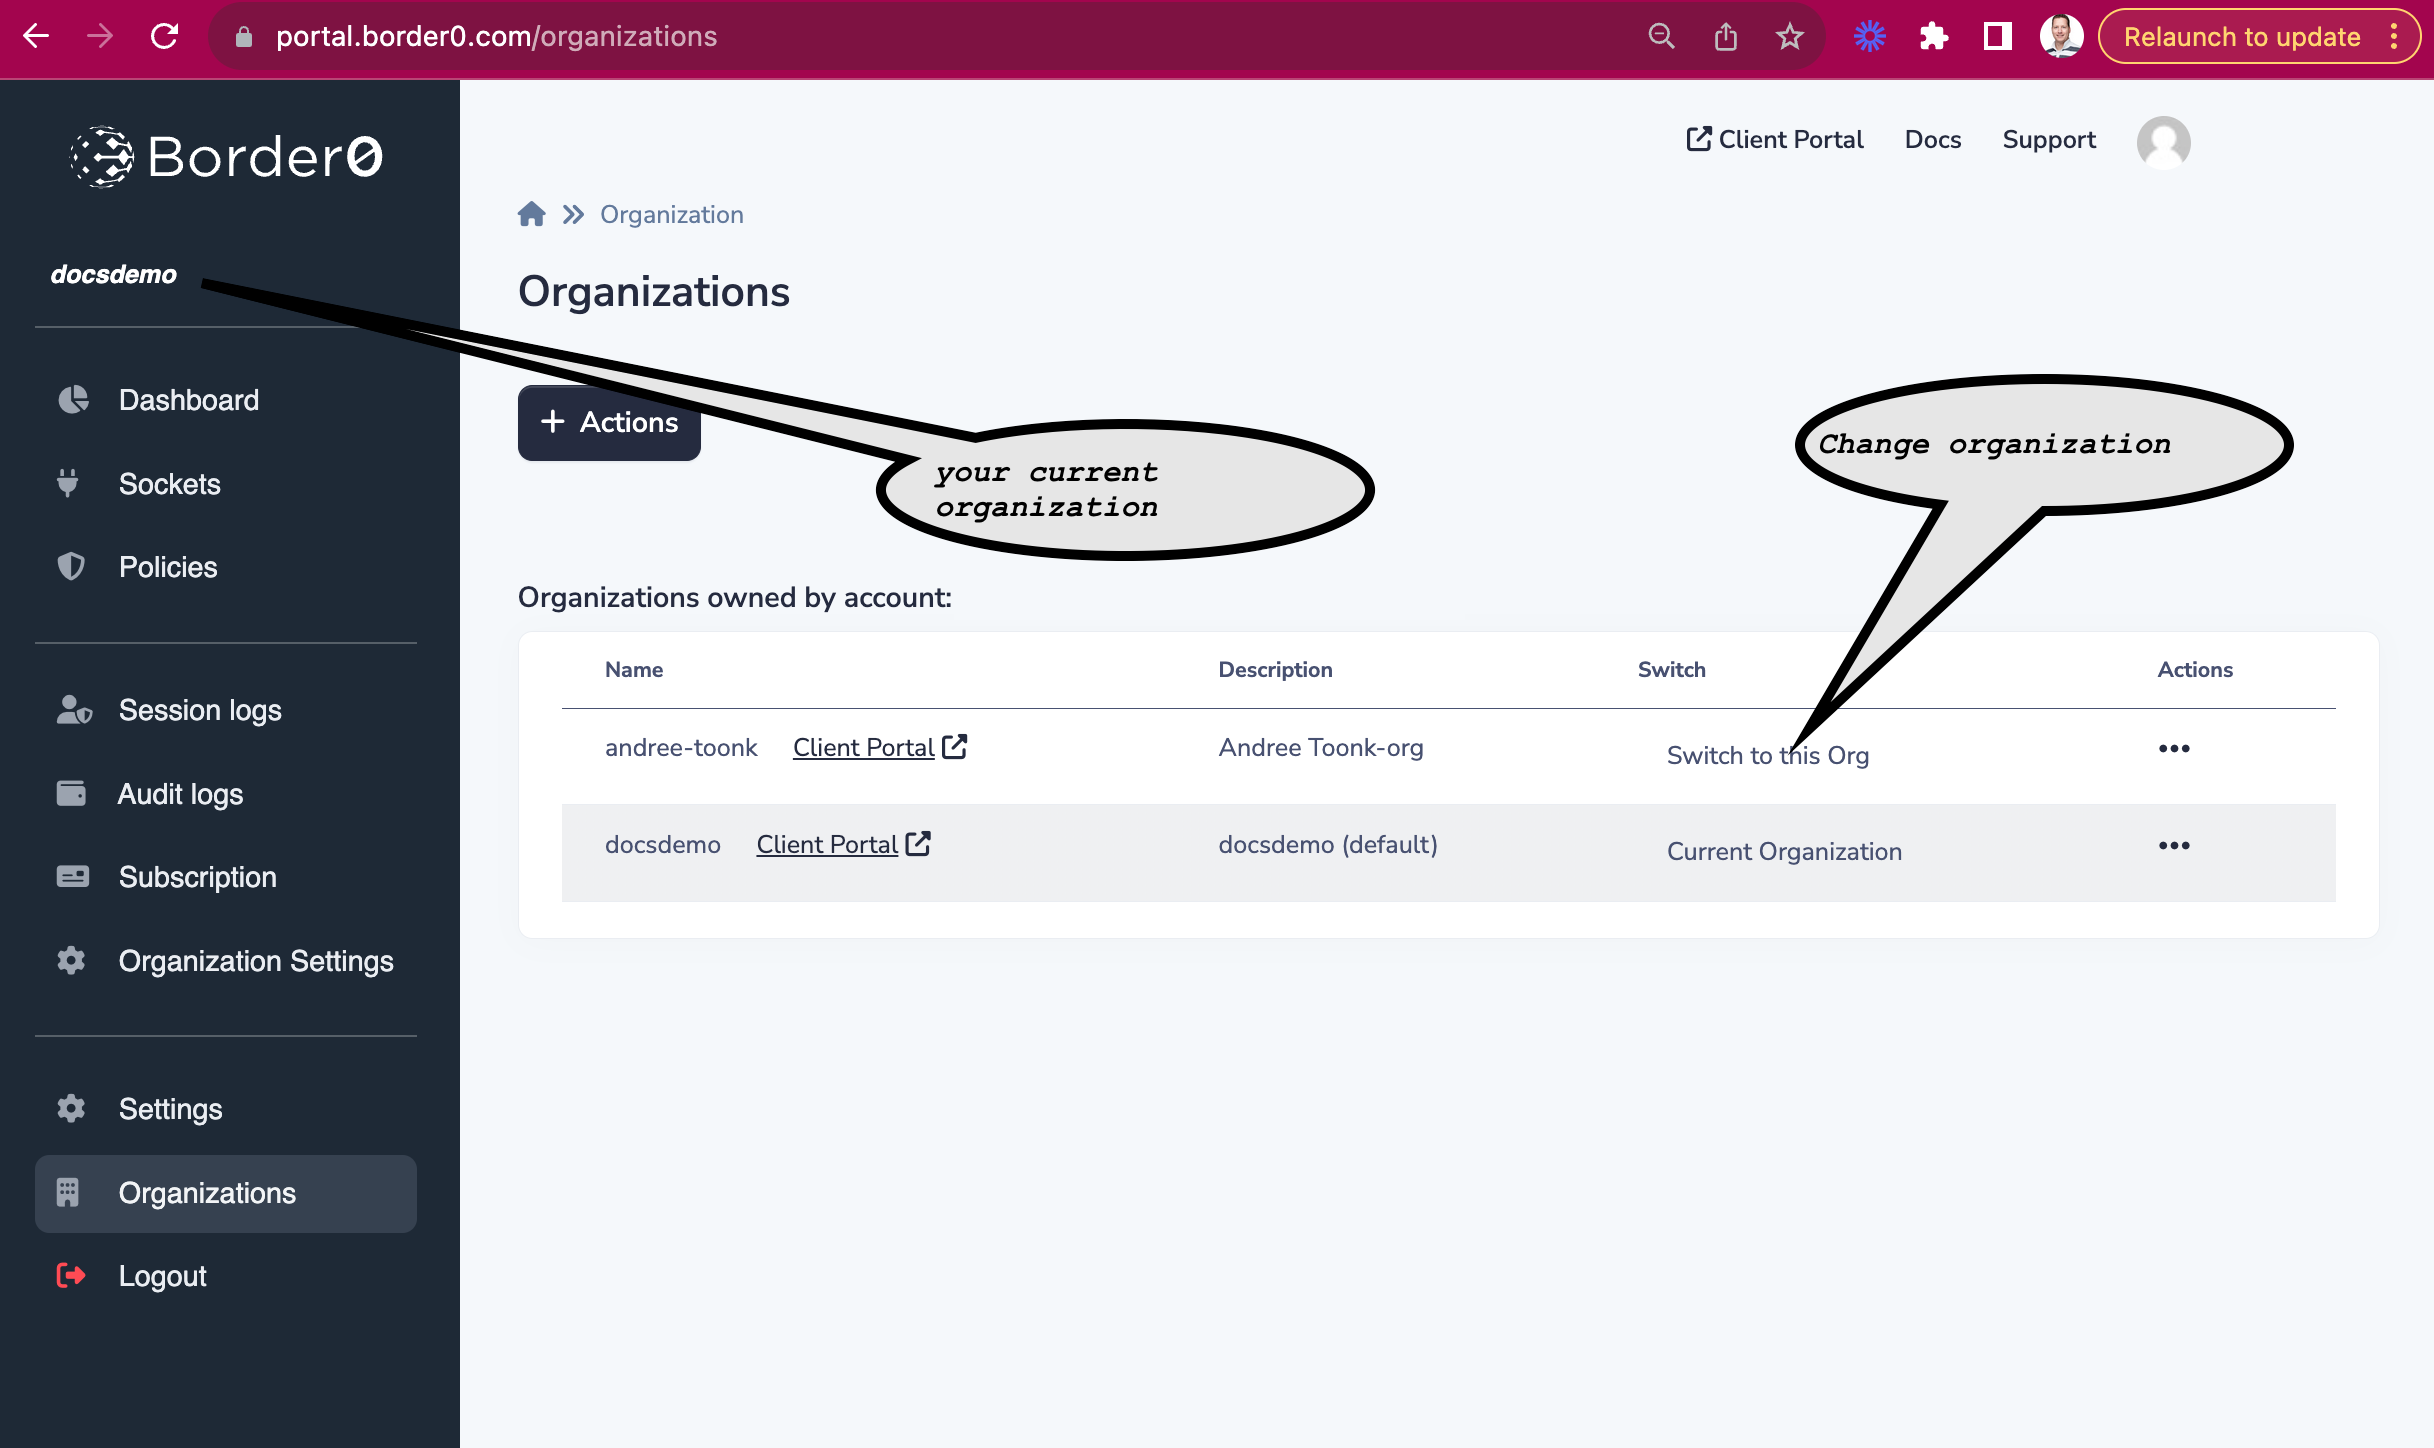
How do I know what my Border0 org name is?
You can find the organization name in the top left corner of the admin portal. The org name shown there is the one you're currently logged into. Note that as an administrator you can have multiple organizations. Listing them and changing between them can be from the Organizations page
What Single sign-on Identity providers are supported
By default the following identity providers are enabled for Clients to log in and authenticate in order to access Sockets.
- Github
- Azure
Premium Border0 customers can use the "bring your own identity provider" feature. This allows you to integrate with existing identity providers such as Google Workspace, Okta, or any OpenID Connect (OIDC) or SAML provider. For more details see our docs on identity providers and this blog: Introducing Custom Identity Providers for Border0.
How do I delete my border0 account?
To request your personal information be deleted, contact [email protected].
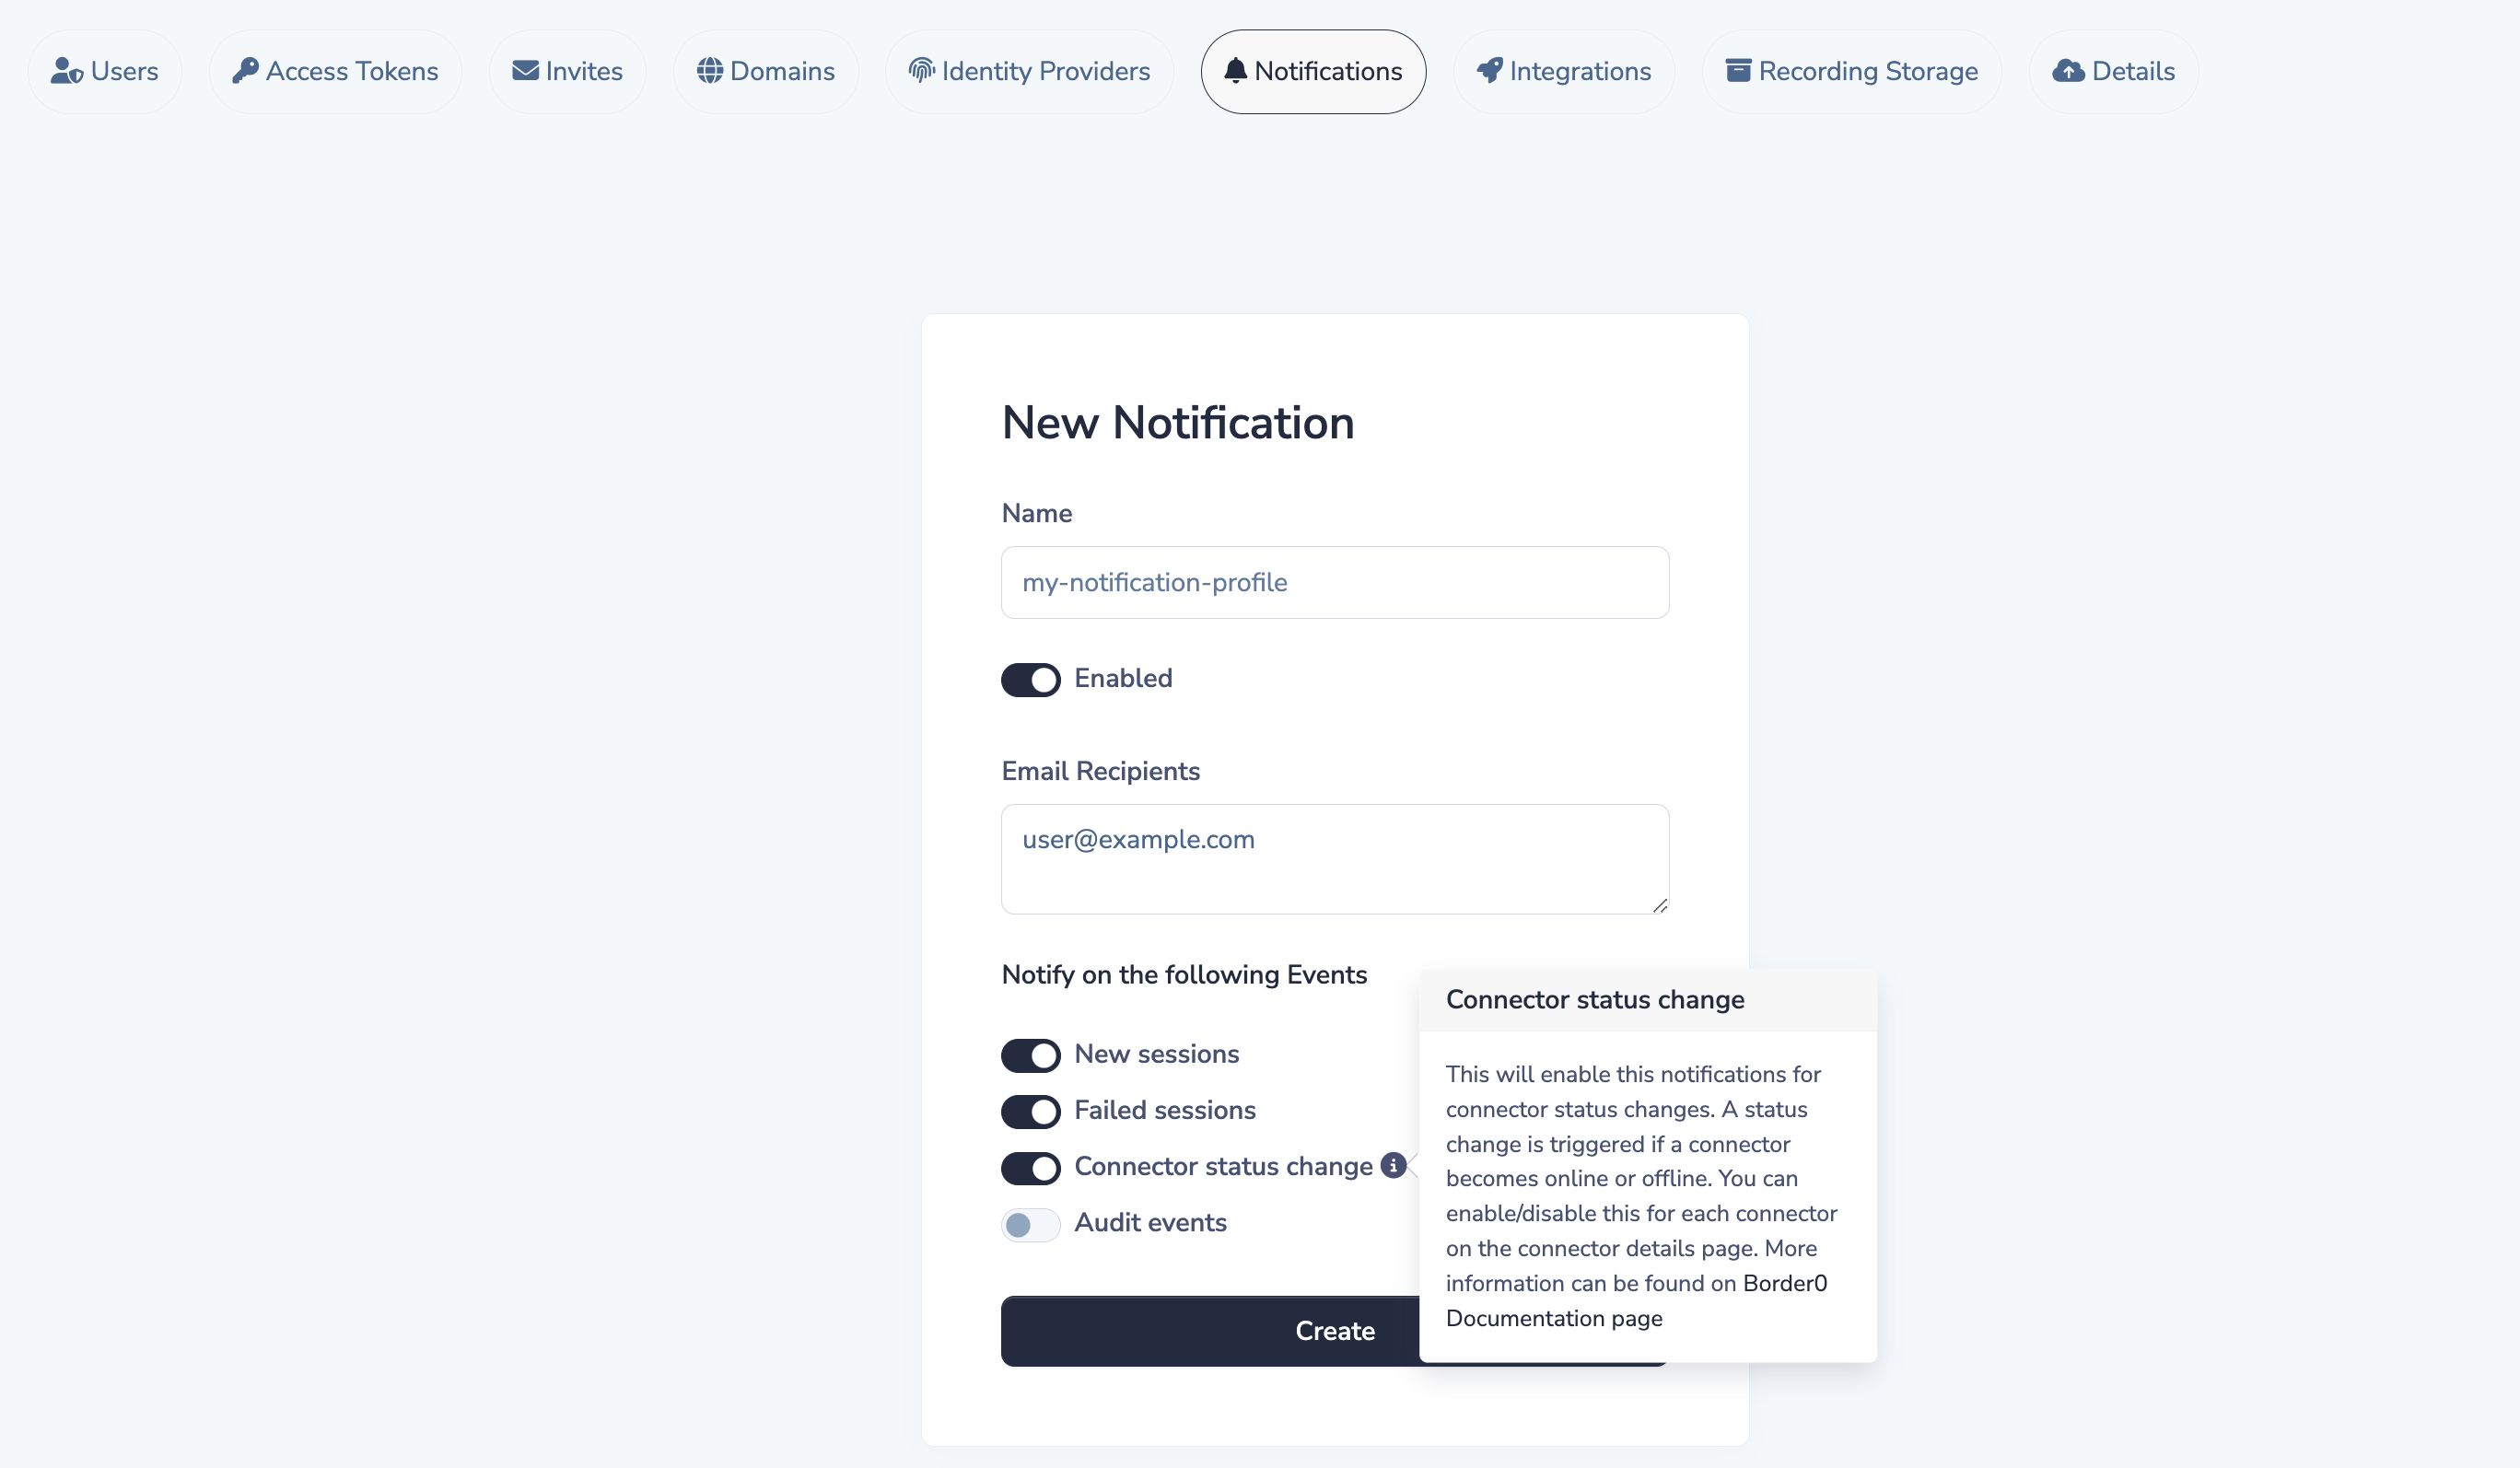
Can I get a notification when my connectors is offline?
Yes, you can configure each connector to send a state notifications message from the organization notification settings page.
So note: you need a notification profile. More documentation about notifications can be found at https://docs.border0.com/docs/setup-notifications
To enable a notification for Connector status changes, make sure you enable this event type in the notification profile.
By default, all connectors will send a notification message when it's offline for more than 10 minutes and when they return online. The duration interval can be configured in the connector details page.
Can the Border0 connector log all sessions?
By default, all session activity is logged and accessible via the Border0 Admin Portal, providing detailed insights including session metadata and replay capabilities.
For enhanced observability, you can configure the Border0 Connector to output session events directly to its local logs. This is particularly useful if you're utilizing log aggregation tools or SIEM systems to monitor session activity in real-time.
To enable session logging in the connector's local logs, set the following environment variables when running the connector:
BORDER0_LOG_SESSIONS=true
BORDER0_LOG_SESSION_EVENTS=true
For example, by modifying the systemd unit file for border0 to include the following
Environment="BORDER0\_LOG\_SESSIONS=true"\
Environment="BORDER0\_LOG\_SESSION\_EVENTS=True"
Afterward, reload the unit file and restart the border0 systemd unit:
systemctl daemon-reload && systemctl restart border0Following this, you will see logs similar to the examples below.
Think of BORDER0_LOG_SESSIONS as the entries you see on the main sessions page. While BORDER0_LOG_SESSION_EVENTS correspond to what you see in the "Events" tab when clicking on a session to view its details.
example for SSH
root@yvr01-vpn:~# journalctl -f -u border0 | grep -i session

May 13 02:53:51 yvr01-vpn bash[884181]: {"level":"info","ts":"2025-05-13T02:53:51Z","msg":"session event","email":"[email protected]","session_id":"9fbe0e50-a7d8-414d-92d1-c7cb43a583a3","socket_id":"ff778ba3-7e62-40ff-bb79-74c5e51e93c0","type":"ssh_session","status":"error","metadata":"{\"user\":\"border0\",\"client_version\":\"SSH-2.0-OpenSSH_9.0\",\"error\":\"failed to send keepalive request: EOF\"}"}
May 13 02:53:52 yvr01-vpn bash[884181]: {"level":"info","ts":"2025-05-13T02:53:52Z","msg":"new session started","email":"[email protected]","session_id":"12e68ad5-4f23-415a-b922-1f52ea0f2ae8","socket_id":"ff778ba3-7e62-40ff-bb79-74c5e51e93c0","session_type":"SSH","server_name":"aws-prod-ecs","client_ip":"24.80.188.36","client_port":"63242"}
May 13 02:53:53 yvr01-vpn bash[884181]: {"level":"info","ts":"2025-05-13T02:53:53Z","msg":"session event","email":"[email protected]","session_id":"12e68ad5-4f23-415a-b922-1f52ea0f2ae8","socket_id":"ff778ba3-7e62-40ff-bb79-74c5e51e93c0","type":"ssh_session","status":"success","metadata":"{\"channel_type\":\"session\",\"user\":\"border0\",\"client_version\":\"SSH-2.0-OpenSSH_9.0\"}"}
May 13 02:53:53 yvr01-vpn bash[884181]: {"level":"info","ts":"2025-05-13T02:53:53Z","msg":"session event","email":"[email protected]","session_id":"12e68ad5-4f23-415a-b922-1f52ea0f2ae8","socket_id":"ff778ba3-7e62-40ff-bb79-74c5e51e93c0","type":"ssh_shell","status":"success","metadata":"{\"username\":\"border0\",\"pty\":true,\"client_version\":\"SSH-2.0-OpenSSH_9.0\"}"}
example for a database session:
May 13 02:54:53 yvr01-vpn bash[884181]: {"level":"info","ts":"2025-05-13T02:54:53Z","msg":"new session started","email":"[email protected]","session_id":"a30bfd89-b436-464e-95bd-09482091b8cd","socket_id":"2444dd20-db01-4240-851b-64338398599b","session_type":"DATABASE","server_name":"demo-db-dk","client_ip":"24.80.188.36","client_port":"63319"}
May 13 02:54:54 yvr01-vpn bash[884181]: {"level":"info","ts":"2025-05-13T02:54:54Z","msg":"session event","email":"[email protected]","session_id":"a30bfd89-b436-464e-95bd-09482091b8cd","socket_id":"2444dd20-db01-4240-851b-64338398599b","type":"database_connection","status":"success","metadata":"{\"client_user\":\"andreetoonk\",\"attributes\":{\"_client_name\":\"libmysql\",\"_client_version\":\"8.4.5\",\"_os\":\"macos13.7\",\"_pid\":\"84118\",\"_platform\":\"x86_64\",\"os_user\":\"andreetoonk\",\"program_name\":\"mysql\"},\"charset\":\"utf8mb4\",\"capabilities\":[\"CLIENT_LONG_PASSWORD\",\"CLIENT_LONG_FLAG\",\"CLIENT_LOCAL_FILES\",\"CLIENT_PROTOCOL_41\",\"CLIENT_INTERACTIVE\",\"CLIENT_TRANSACTIONS\",\"CLIENT_SECURE_CONNECTION\",\"CLIENT_MULTI_STATEMENTS\",\"CLIENT_MULTI_RESULTS\",\"CLIENT_PS_MULTI_RESULTS\",\"CLIENT_PLUGIN_AUTH\",\"CLIENT_CONNECT_ATTRS\",\"CLIENT_PLUGIN_AUTH_LENENC_CLIENT_DATA\",\"(4194304)\",\"(8388608)\",\"(16777216)\",\"(134217728)\",\"(268435456)\"],\"database\":\"\"}"}
What ports and protocols need to be allowed for Border0 to work?
To ensure seamless communication between Border0 clients and connectors, please configure your firewall to allow the following traffic:
- Peer-to-Peer WireGuard Traffic
- Protocol: UDP
- Port: 32442
- Destination: Any (or the IP addresses of all connectors/clients)
- Direction: Inbound and outbound
- Description: Enables direct peer-to-peer WireGuard connections between clients and connectors for optimal performance.
- Relay Connectivity (for reliable NAT traversal)
- Protocol: TCP
- Port: 443
- Destination:
relay.border0.com - Direction Allow Outbound connections: ie outgoing connections to relay.border0.com:443
- Description: Ensures connectivity when direct peer-to-peer communication is not possible. This uses WireGuard over HTTPS, allowing clients and connectors behind strict NATs or firewalls to connect via the Border0 relay service.
- STUN Traffic
- Protocol: UDP
- Port: 3478 + 19302
- Destination:
stun.cloudflare.com:3478 - Destination:
stun.l.google.com:19302 - Direction Allow Outbound connections
- Description: Allows clients and connectors to discover their public-facing IP addresses and NAT types, facilitating NAT traversal.
- Control Plane Communication
- Protocol: TCP
- Port: 443
- Destination:
api.border0.com - Direction Allow Outbound connections: ie outgoing connections to capi.border0.com:443
- Description: Used by clients and connectors to communicate with the Border0 control plane to retrieve configurations, policies, and other management data.
To learn more about these protocols and understand how border0 works under the hood, make sure to read this blog: "Building The World’s First Application-Aware VPN"
What encryption algorithms does Border0 use?
Border0 leverages the WireGuard protocol to establish secure, high-performance connections between clients and connectors. WireGuard is renowned for its simplicity and robust cryptographic design, utilizing a suite of modern, thoroughly vetted cryptographic primitives:
- ChaCha20 for symmetric encryption, authenticated with Poly1305, employing the AEAD construction as specified in RFC 7539.
- Curve25519 for Elliptic Curve Diffie-Hellman (ECDH) key exchange.
- BLAKE2s for hashing and keyed hashing, as described in RFC 7693.
- SipHash24 for generating hashtable keys.
- HKDF (HMAC-based Extract-and-Expand Key Derivation Function) for key derivation, as outlined in RFC 5869.
This combination ensures that all data transmitted through Border0 is encrypted with state-of-the-art algorithms, providing both security and performance. For a deeper dive into the WireGuard protocol and its cryptographic foundations, please refer to the official WireGuard protocol documentation: https://www.wireguard.com/protocol/.
Updated 14 days ago