Access to a Postgres server
🛡️ Intro
In this example, we'll secure access to a Postgres server using Border0.
We'll walk through the following steps together.
- Launch a Postgres server (Docker)
- Create a database socket and link it to our connector
- Connecting to Your PostgreSQL Database
- Review Session Details and Recordings
- Troubleshooting
1 Run a local Postgres server with docker
You can make any Postgres database server available with Border0; for testing purposes, we'll use a Postgres Docker container that we'll run locally as the server.
It works through NAT and FirewallsDon't worry if your laptop is behind NAT. Border0 works perfectly fine with resources that are behind NAT.
Let's start the docket container like this
docker run --name postgres-server \
  -e POSTGRES_PASSWORD=my-secret-pw -d -p 5432:5432  postgres
This will start a local Postgres server listening on port 5432, with my-secret-pw as password for the user postgres.
Before we continue, let's just make sure if it came up ok and test connecting to the Postgres database locally as user postgres and password my-secret-pw
$ psql -h localhost -U postgres
Password for user postgres:
psql (14.5)
Type "help" for help.

postgres=#
Cool! Now we have a working server and can start making it available!
2 - Create a database socket and connect.
Now that we have a working database for our example it's time to create a database socket and link it to our connector.
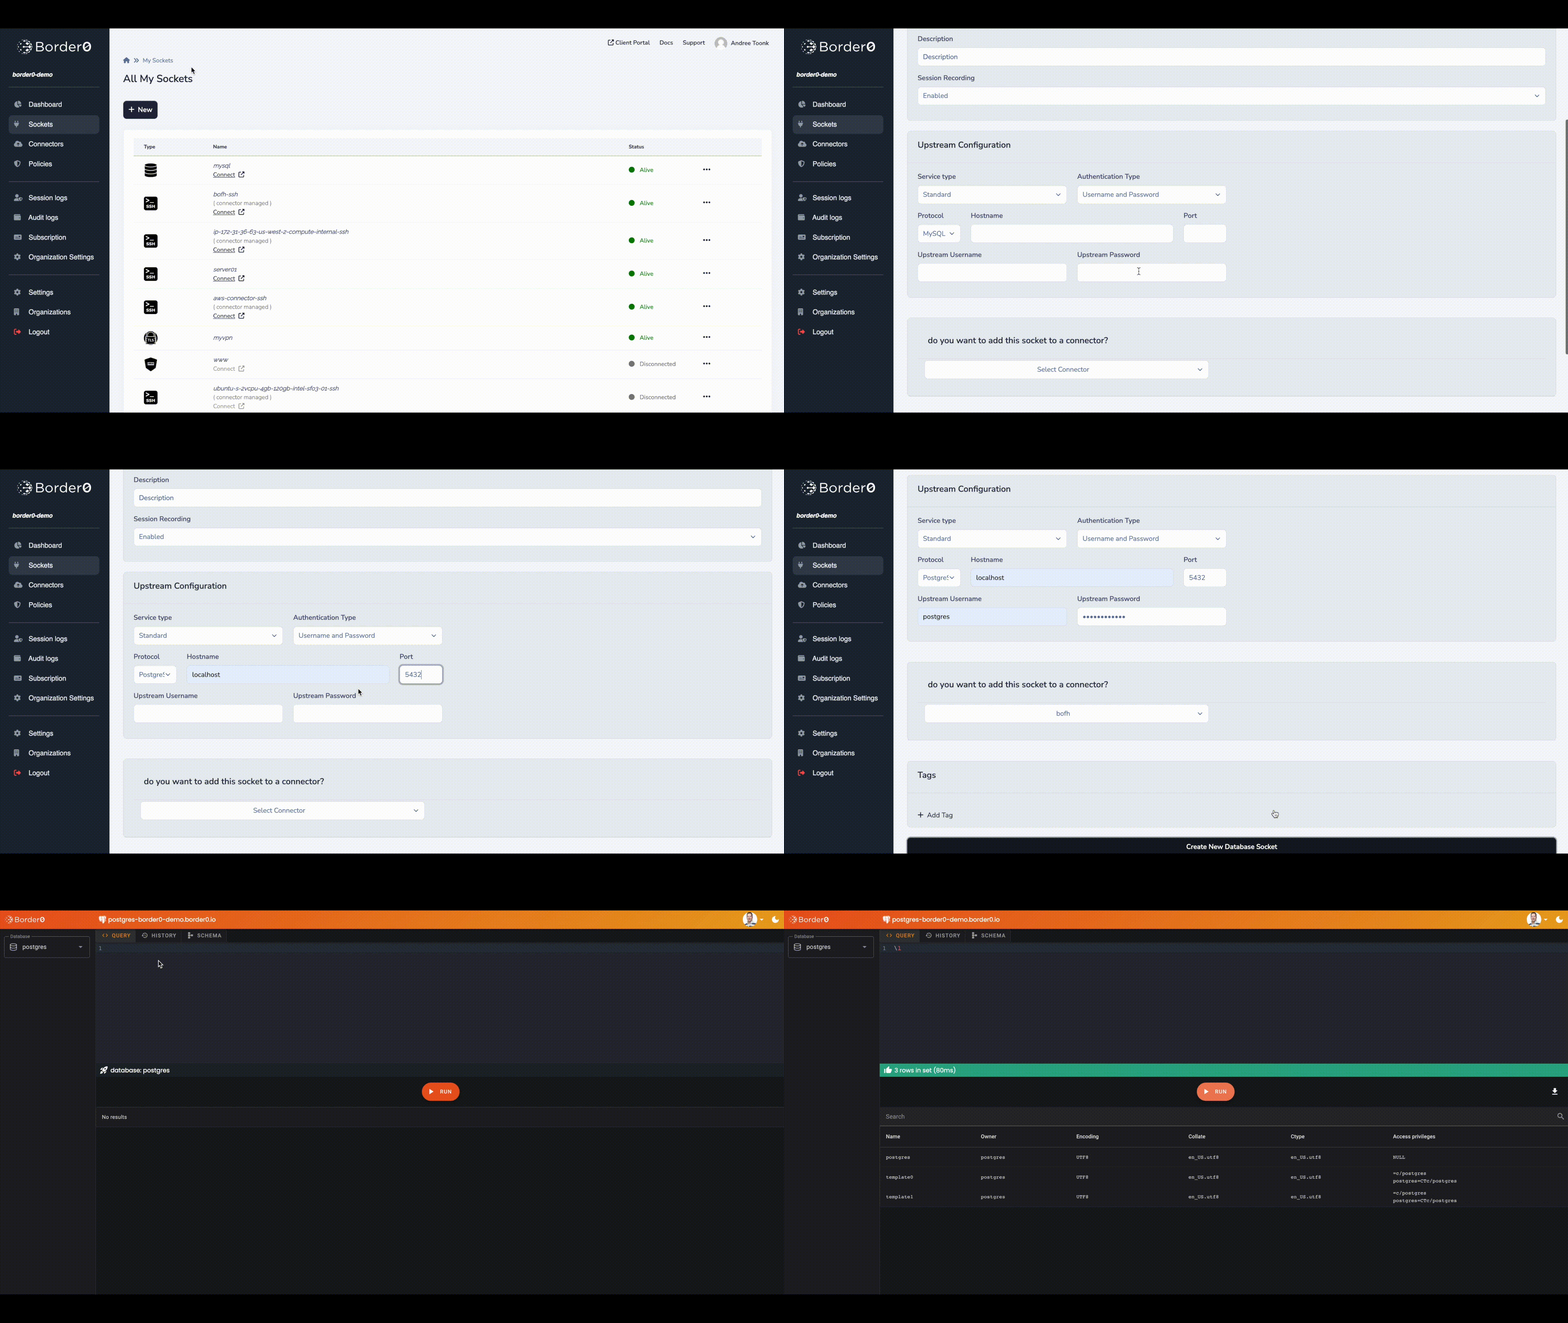
- In the Sockets page, click on new Database socket
- set a name and optionally a description
Upstream Configuration
here we can configure how your connector can connect and authenticate to the upstream database server.
- Select standard for Service type
- For authentication select username and password.
- Protocol: Postgres since we're working with a Postgres server
- For hostname and port we'll use localhost and port 5432. Adjust as needed for your environment.
- Credentials, in our example we used username postgres and password my-secret-pw Adjust as needed for your environment.
- Connector: Select your connector from the list
That's it, now click create new socket button. And you should have access to your Postgres database.

Now your database is ready to accept connections through border0. Clients can access your database from anywhere (no VPN needed), just using their Single sign-on credentials.
Securing your credentialsIn the preceding example, we configured Border0 with credentials to access an upstream database. These credentials are essential for the connector running in your environment to establish a secure connection. While Border0 stores these credentials in encrypted form, we strongly recommend that you keep them local to the connector.
You can have the Border0 connector integrated with your secret management solution for enhanced security and keep your secrets local. Learn more about this in our guide:https://docs.border0.com/docs/using-secret-managers-to-store-credentials
PolicyRemember that we haven't yet attached a policy to this socket, so the default organization-wide policies are applied automatically.
By default, our proxy will try to establish a secure database connection using TLS. If the database server does not support TLS, it will fall back to a non-TLS connection.
Troubleshooting
Should you see any issues with your new socket, it's typically because it can't connect to the upstream database. To troubleshoot that take a look at the connector logs as described here
3 - Connecting to Your PostgreSQL Database
You can connect to your PostgreSQL database using three convenient methods: the Border0 desktop app, our agentless client portal, or the command-line interface (CLI).
For the fastest and most seamless experience, use our desktop app. It simplifies the process of discovering and connecting to your PostgreSQL databases with your preferred database client.

Using the Command-Line Interface (CLI)
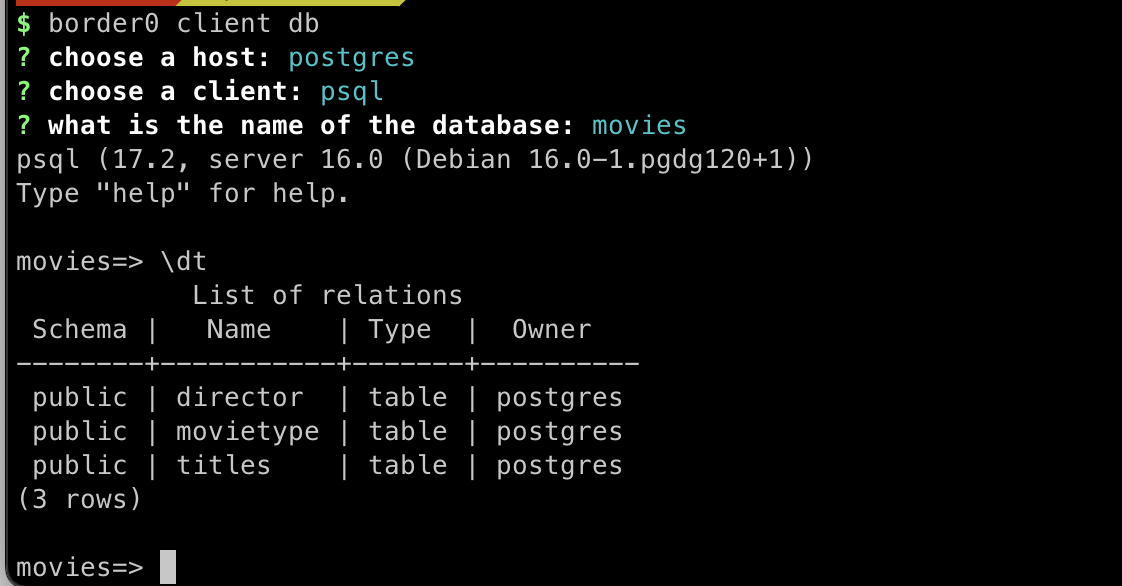
For advanced users or those who prefer the CLI, you can use the border0 CLI tool
- List available databases: Use the
border0 client dbcommand to list all databases you have access to - Select your postgres database
- Select your preferred client: The CLI will display a list of supported SQL Server clients, including:
- psql
- pgcli
- dbeaver
- datagrip
- TablePlus
border0 client db
If your favorite client is not listed, you can always connect with your client of choice, simply use the socket name as the server name.
4 - Review Session Details and Recordings
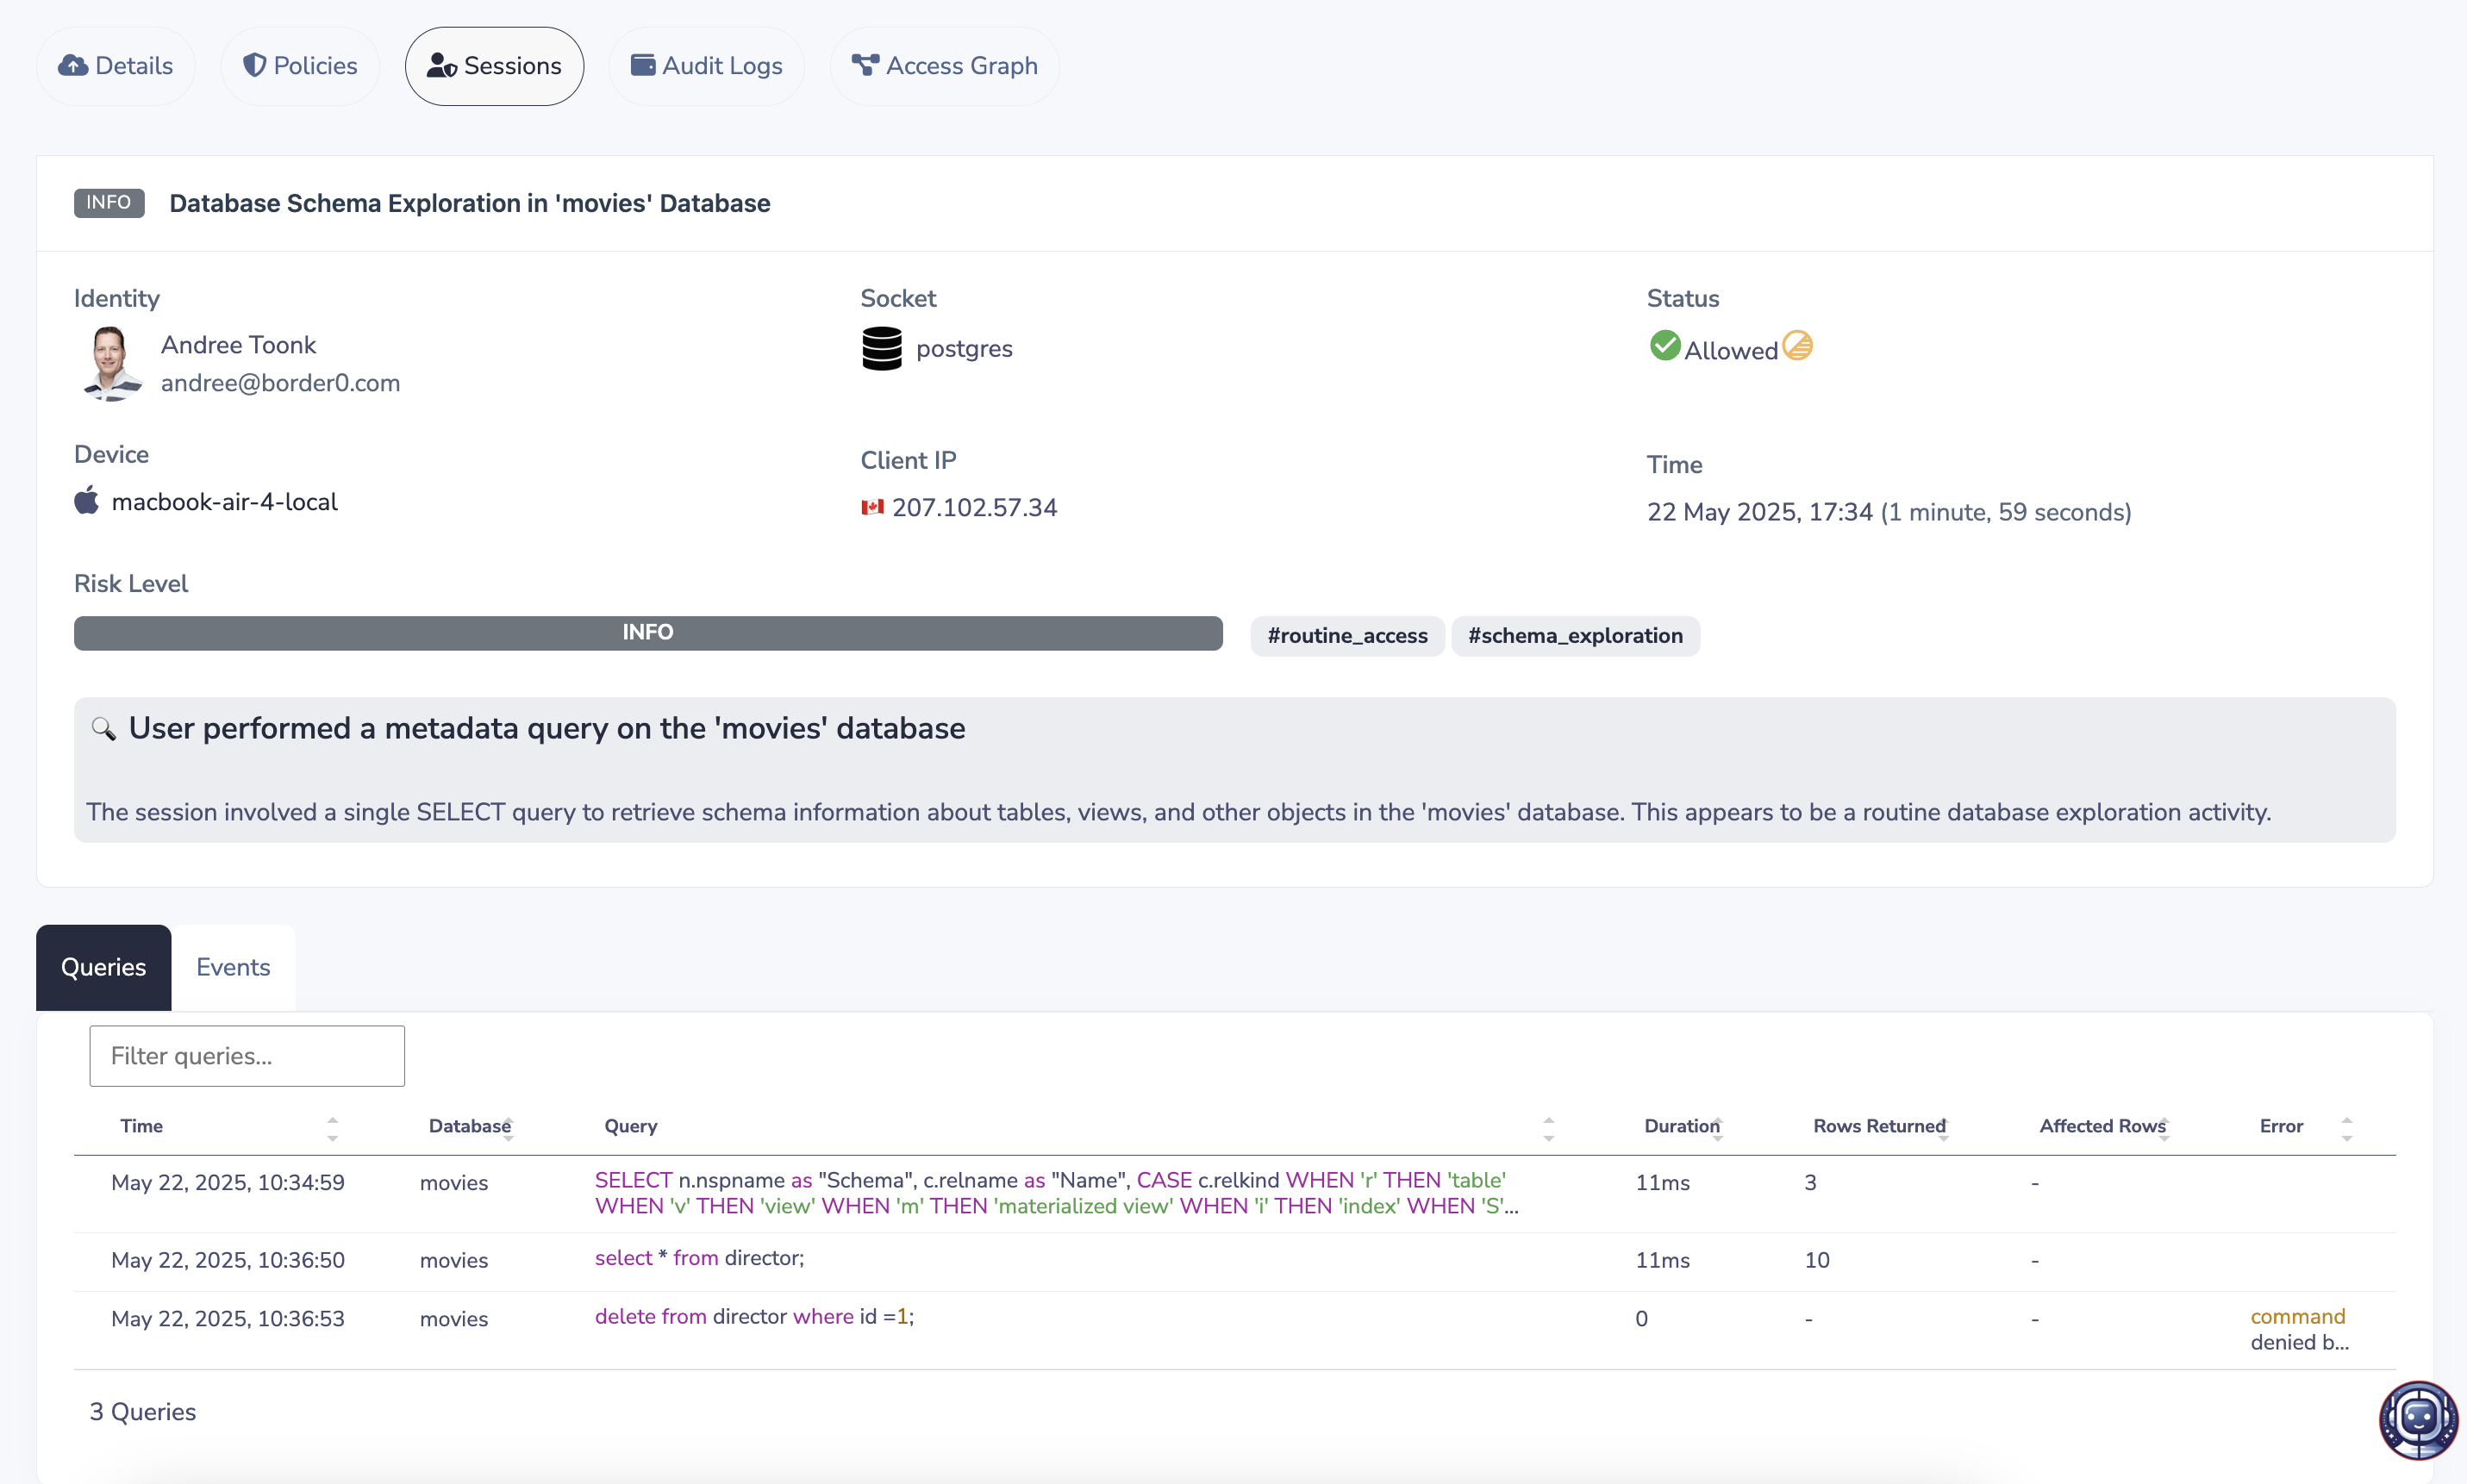
To review your Postgres database session, open the Border0 portal and select the corresponding database socket. Go to the "Sessions" tab and find your session. Clicking on the session will display a recording of the activity. This recording details the SSO identity used (who connected), the originating IP address, Device, connection time, and a complete log of all executed SQL queries.

6 - Troubleshooting
Should you see any issues with your new socket, it's typically because it can't connect to the upstream database. To troubleshoot that take a look at the connector logs as described here.
If that doesn't help resolve the issue, feel free to contact us, and we'd be happy to help you troubleshoot.
Updated 9 months ago
